

代码拉取完成,页面将自动刷新
redis详解
redis 是一个开放源码(BSD 许可)、内存中的数据结构存储,用作数据库、缓存和消息代理。 它支持数据结构,比如字符串、散列、列表、集合、带有范围查询的排序集、位图、超级日志、带有半径查询和流的地理空间索引。 Redis 具有内置的复制、 Lua 脚本、 LRU 收回、事务和不同级别的磁盘持久性,并通过 Redis Sentinel 提供高可用性服务,通过 Redis Cluster 提供自动分区
Redis和Memcached类似,也是NoSQL的一种,是一个基于内存的高性能key-value(k-v)数据库。
Redis支持string、list、set、zset(sorted set)和hash类型数据,这些数据类型都支持push/pop、add/remove及取交集、并集和差集及更丰富的操作,对这些数据的操作都是原子性的。
与memcached一样,为了保证效率,数据都是缓存在内存中。区别的是redis会周期性的把更新的数据写入磁盘或者把修改操作写入追加的记录文件,并且在此基础上实现了master-slave(主从)同步。redis的出现,很大程度补偿了memcached这类key/value存储的不足,在部 分场合可以对关系数据库起到很好的补充作用。它提供了Java,C/C++,C#,PHP,JavaScript,Perl,Object-C,Python,Ruby,Erlang等客户端,使用很方便。
数据可以从主服务器向任意数量的从服务器上同步,从服务器可以是关联其他从服务器的主服务器。这使得Redis可执行单层树复制。存盘可以有意无意的对数据进行写操作。由于完全实现了发布/订阅机制,使得从数据库在任何地方同步树时,可订阅一个频道并接收主服务器完整的消息发布记录。同步对读取操作的可扩展性和数据冗余很有帮助。
此外,Redis使用了两种文件格式:全量数据(RDB)和增量请求(aof)。全量数据格式是把内存中的数据写入磁盘,便于下次读取文件时进行加载;增量请求则是把内存中的数据序列转化为操作请求,用于读取文件进行replay得到数据,这种类似于mysql的binlog。Redis的存储分为内存存储、磁盘存储和log文件三部分。
# wget http://download.redis.io/releases/redis-5.0.8.tar.gz

# tar -zxvf redis-5.0.8.tar.gz

# cd redis-5.0.8

# make && make install
编辑redis.conf配置文件做如下修改:
# 后台启动
daemonize yes

# 设置日志存放路径
logfile "/data/redis-linux/redis.logs"

# RDB存放目录
dir /data/redis-linux/rdb

# 开启AOF
appendonly yes

# 关闭protected-mode模式,此时外部网络可以直接访问
# 开启protected-mode保护模式,需配置bind ip或者设置访问密码
protected-mode no

# 设置redis访问密码
requirepass root
编写redis运行脚本start.sh
#!/bin/bash

ID=$(ps -ef | grep redis | grep 6379 | awk '{print $2}')
echo $ID
echo "---------- start build ----------"

kill -9 $ID

redis-server redis-5.0.8/redis.conf

echo "---------- end build ----------"
运行start.sh脚本
$ chmod +x start.sh

$ ./start.sh
# 下载redis配置文件

wget http://download.redis.io/redis-stable/redis.conf

# 编辑配置文件

# 后台启动
daemonize yes

# 设置日志存放路径
logfile "/data/redis-linux/redis.logs"

# RDB存放目录
dir /data/redis-linux/rdb

# 开启AOF
appendonly yes

# 关闭protected-mode模式,此时外部网络可以直接访问
# 开启protected-mode保护模式,需配置bind ip或者设置访问密码
protected-mode no

# 设置redis访问密码
requirepass root
编写Dockerfile
# 复制上一步修改的配置文件到redis中
COPY redis.conf /usr/local/etc/redis/redis.conf

# 修改文件权限,后面设置密码可以通过config rewrite重写
RUN chmod 777 /usr/local/etc/redis/redis.conf

# Redis客户端连接端口
EXPOSE 6381

# 集群总线端口
EXPOSE 16381

# 启动redis服务
CMD [ "redis-server", "/usr/local/etc/redis/redis.conf" ]
新增网络
docker network create --driver=bridge --subnet=172.20.0.0/16 redisnetwork
编写docker-compose.yml
#指定docker-compose的文件版本可参考 https://docs.docker.com/compose/compose-file/
version: '3'
services:
  redis-slave-one:
    hostname: redis-slave-one #指定服务名
    container_name: redis-slave-one #指定镜像名
    build: . #指定Dockerfile所在目录
    volumes:
     - /data/redis-cluster/6100:/data #挂载目录
    ports:
     - 6100:6100 #段扩映射
    networks:
      default:
        ipv4_address: 172.20.0.2 #指定网络ip
    environment: #指定时区
      - SET_CONTAINER_TIMEZONE=true
      - CONTAINER_TIMEZONE=Asia/Shanghai
    privileged: true #开启安全模块selinux把权限
    restart: always #重启docker,自动重启

networks:
  default:
    external:
      name: redisnetwork #指定使用自定义的网络
常用命令
# 停止指定docker容器运行
$ docker-compose -f redis.yml stop

# 删除指定docker容器
$ docker-compose -f redis.yml rm --force

# 运行指定docker容器
$ docker-compose -f redis.yml up -d
Redis提供了两种持久化的方式:RDB(Redis DataBase)和AOFAppend Only File)
RDB和AOF两种方式也可以同时使用,在这种情况下,如果redis重启,则会优先采用AOF方式来进行数据恢复,这是因为AOF方式的数据恢复完整度更高。如果没有数据持久化的需求,也可以完全关闭RDB和AOF,这样的话,redis将变成一个纯内存数据库,就像memcached一样。
RDB,简而言之,就是在不同的时间点,将redis存储的数据生成快照并存储到磁盘等介质上。
# RDB的默认保存策略如下:

save 900 1				#表示900s内发生了1次更改
save 300 10				#表示300s内发生了10次更改
save 60 10000			#表示60s内发生了10000次更改

# 关闭RDB

save ""
AOF,则是将redis执行过的所有写指令记录下来,在下次redis重新启动时,只要把这些写指令从前到后再重复执行一遍,就可以实现数据恢复了。
# AOF的保存策略如下:

appendfsync always				#一直记录,每次有变更就记录
appendfsync everysec			#每秒记录一次
appendfsync no				    #每隔一段时间记录一次,根据系统里面算法决定,不安全
Redis的数据类型有五种:string、list、set、zset、hash
string是最简单的类型,与Memcached一样的类型,一个key对应一个value,其支持的操作与Memcached的操作类似,不过功能更丰富,可以存二进制的对象。
# redis-cli				#进入redis命令行

127.0.0.1:6379> set mykey "123"
OK

127.0.0.1:6379> get mykey
"123"

127.0.0.1:6379> MSET k1 1 k2 2 k3 3				#支持Tab键将命令可以自动补全
OK

127.0.0.1:6379> mget k1 k2 k3 mykey
1) "1"
2) "2"
3) "3"
4) "123"
list是一个链表结构,主要功能是push、pop、获取一个范围的所有值等。操作中key可理解为链表的名字。
使用list结构,可以轻松实现最新消息排行等功能(比如新浪微博的TimeLine)。list的另一个应用就是消息队列,可以利用list的push操作将任务存在list中,然后工作线程再用pop操作将任务取出执行。
127.0.0.1:6379> LPUSH list1 "lzx"				#LPUSH表示推进去
(integer) 1

127.0.0.1:6379> LPUSH list1 "123"
(integer) 2

127.0.0.1:6379> LPUSH list1 "aaa"
(integer) 3

127.0.0.1:6379> LRANGE list1 0 -1				#0表示第一位,-1表示最后一位
1) "aaa"
2) "123"
3) "lzx"				#最先推进去的排在后面

127.0.0.1:6379> LPOP list1				#LPOP表示取出来,取出最前面的
"aaa"

127.0.0.1:6379> LRANGE list1 0 -1
1) "123"
2) "lzx"				#取出来的数据就不在list1中了
set是集合,和我们数学中的集合概念相似,对集合的操作有添加、删除元素,有对多个集合求交并差等操作。操作中key可理解为集合的名字。
比如在微博应用中,可以将一个用户所有的关注人存在一个集合中,将其所有粉丝存在一个集合中。因为Redis非常人性化地为集合提供了求交集、并集、差集等操作,那么可以很方便地实现如共同关注、共同爱好、二度好友等功能,对上面的所有集合操作,你还可以使用不同的命令选择将结果返回给客户端还是存集到一个新的集合中。
127.0.0.1:6379> SADD set1 a
(integer) 1

127.0.0.1:6379> SADD set1 b
(integer) 1

127.0.0.1:6379> SADD set1 c
(integer) 1

127.0.0.1:6379> SMEMBERS set1
1) "a"
2) "b"
3) "c"

127.0.0.1:6379> SADD set2 1
(integer) 1

127.0.0.1:6379> SADD set2 2
(integer) 1

127.0.0.1:6379> SADD set2 c
(integer) 1

127.0.0.1:6379> SMEMBERS set2
1) "2"
2) "c"
3) "1"

127.0.0.1:6379> SUNION set1 set2				#SUNION表示求并集
1) "2"
2) "b"
3) "c"
4) "a"
5) "1"

127.0.0.1:6379> SINTER set1 set2				#SINTER表示求交集
1) "c"

127.0.0.1:6379> SDIFF set1 set2				#SDIFF表示求差集,针对set1求差集,去除交集的部分
1) "a"
2) "b"

127.0.0.1:6379> SREM set1 b				#SREM表示删除元素
(integer) 1

127.0.0.1:6379> SMEMBERS set1
1) "a"
2) "c"
zset是有序集合,它比set多了一个权重参数score,使集合中的元素能够按score进行有序排列。
比如一个存储全班同学成绩的Sorted Sets,其集合中value可以是同学的学号,而score就可以是其考试分数,这样在数据插入集合的时候,就已经进行了天然的排序。
127.0.0.1:6379> ZADD set3 12 abc
(integer) 1

127.0.0.1:6379> ZADD set3 2 "cde 123"
(integer) 1

127.0.0.1:6379> ZADD set3 24 "lzx"
(integer) 1

127.0.0.1:6379> ZADD set3 4 "linux"
(integer) 1

127.0.0.1:6379> ZRANGE set3 0 -1				#顺序排列set3,0表示第一位,-1表示最后一位
1) "cde 123"
2) "linux"
3) "abc"
4) "lzx"

127.0.0.1:6379> ZREVRANGE set3 0 -1				#倒序排列set3
1) "lzx"
2) "abc"
3) "linux"
4) "cde 123"
hash,Redis和Memcached类似,在Memcached中,我们经常将一些结构化的信息打包成hashmap,在客户端序列化后存储为一个字符串的值(一般是JSON格式),比如用户的昵称、年龄、性别、积分等。
127.0.0.1:6379> HSET hash1 name lzx
(integer) 1

127.0.0.1:6379> HSET hash1 age 20
(integer) 1

127.0.0.1:6379> HSET hash1 job it            //添加了3对子元素,每一对子元素都可以看做是一个key-value
(integer) 1

127.0.0.1:6379> HSET hash1 name lzx
(integer) 1

127.0.0.1:6379> HSET hash1 age 20
(integer) 1

127.0.0.1:6379> HSET hash1 job it
(integer) 1

127.0.0.1:6379> HGET hash1 name				#查看hash1中name
"lzx"

127.0.0.1:6379> HGET hash1 age
"20"

127.0.0.1:6379> HGET hash1 job
"it"

127.0.0.1:6379> HGETALL hash1				#查看hash1全部
1) "name"
2) "lzx"
3) "age"
4) "20"
5) "job"
6) "it"
127.0.0.1:6379> set key1 lzx
OK

127.0.0.1:6379> set key2 123
OK

127.0.0.1:6379> set key1 aaa
OK

127.0.0.1:6379> get key1
"aaa"				#第二次赋值将之前赋值覆盖
127.0.0.1:6379> SETNX key1 linux				#key1存在,所以返回0
(integer) 0

127.0.0.1:6379> get key1
"aaa"				#并且不改变key1的value

127.0.0.1:6379> SETNX key3 111				#key3不存在,所以直接创建,返回1
(integer) 1

127.0.0.1:6379> get key3
"111"
127.0.0.1:6379> set key3 111 ex 10				#给key3设置过期时间,为10s,set时ex不可省略
OK

127.0.0.1:6379> get key3				#过10s之后查看,value为空
(nil)

127.0.0.1:6379> SETEX key3 1000 222				#SETEX设置过期时间为1000s,后面222为value,若key3已存在则覆盖
OK

127.0.0.1:6379> get key3
"222"
127.0.0.1:6379> LPUSH list2 aaa
(integer) 1

127.0.0.1:6379> LPUSH list2 bbb
(integer) 2

127.0.0.1:6379> LPUSH list2 ccc
(integer) 3

127.0.0.1:6379> LRANGE list2 0 -1
1) "ccc"
2) "bbb"
3) "aaa"

127.0.0.1:6379> LPOP list2				#取出的是最后加入的值
"ccc"

127.0.0.1:6379> LRANGE list2 0 -1				#取出的值已经不在list2中
1) "bbb"
2) "aaa"

127.0.0.1:6379> RPOP list2				#取出最先加入的值,跟LPOP相反
"aaa"
127.0.0.1:6379> LRANGE list2 0 -1
1) "bbb"

127.0.0.1:6379> LINSERT list2 before bbb 111				#LINSERT表示插入,在bbb前面插入111
(integer) 2

127.0.0.1:6379> LINSERT list2 after bbb ddd				#在bbb后面插入ddd
(integer) 3

127.0.0.1:6379> LINSERT list2 after ddd fff
(integer) 4

127.0.0.1:6379> LRANGE list2 0 -1
1) "111"
2) "bbb"
3) "ddd"
4) "fff"
127.0.0.1:6379> LSET list2 1 123				#LSET表示修改,将第2个值改为123
OK

127.0.0.1:6379> LSET list2 3 abc				#将第4个值改为abc
OK

127.0.0.1:6379> LRANGE list2 0 -1
1) "111"
2) "123"
3) "ddd"
4) "abc"
127.0.0.1:6379> LINDEX list2 1				#LINDEX表示查看,查看第2个值
"123"

127.0.0.1:6379> LINDEX list2 3				#查看第4个值
"abc"
127.0.0.1:6379> LLEN list2				#LLEN查看列表中有几个元素
(integer) 4				#表示list2中有4个元素
127.0.0.1:6379> SADD set1 aaa				#SADD表示添加元素,添加元素aaa
(integer) 1

127.0.0.1:6379> SADD set1 bbb
(integer) 1

127.0.0.1:6379> SADD set1 ccc
(integer) 1

127.0.0.1:6379> SMEMBERS set1				#SMEMBERS表示查看集合中所有元素
1) "bbb"
2) "aaa"
3) "ccc"
127.0.0.1:6379> SREM set1 aaa				#SREM表示删除元素,删除元素aaa
(integer) 1

127.0.0.1:6379> SMEMBERS set1
1) "bbb"
2) "ccc"
127.0.0.1:6379> SPOP set1 1				#SPOP表示取出元素,1表示第2个元素
1) "ccc"

127.0.0.1:6379> SMEMBERS set1
1) "bbb"				#取出的元素就不再在set1中
127.0.0.1:6379> SADD set1 aaa
(integer) 1

127.0.0.1:6379> SADD set1 ccc
(integer) 1

127.0.0.1:6379> SADD set1 222
(integer) 1

127.0.0.1:6379> SMEMBERS set1
1) "bbb"
2) "aaa"
3) "222"
4) "ccc"

127.0.0.1:6379> SADD set2 aaa
(integer) 1

127.0.0.1:6379> SADD set2 ccc
(integer) 1

127.0.0.1:6379> SADD set2 111
(integer) 1

127.0.0.1:6379> SMEMBERS set2
1) "aaa"
2) "111"
3) "ccc"

127.0.0.1:6379> SDIFF set1 set2				#SDIFF表示求差集,set1在前面就是以set1为标准
1) "bbb"
2) "222"

127.0.0.1:6379> SDIFF set2 set1
1) "111"
127.0.0.1:6379> SDIFFSTORE set3 set1 set2				#SDIFFSTORE表示求出差集并保存到新集合中,set3为新集合
(integer) 2

127.0.0.1:6379> SMEMBERS set3
1) "bbb"
2) "222"
127.0.0.1:6379> SINTER set1 set2				#SINTER表示求交集
1) "aaa"
2) "ccc"
127.0.0.1:6379> SUNION set1 set2				#SUNION表示求并集
1) "ccc"
2) "222"
3) "bbb"
4) "aaa"
5) "111"
127.0.0.1:6379> SUNIONSTORE set5 set1 set2				#SUNIONSTORE表示求并集并保存到新集合中,set5为新集合
(integer) 5

127.0.0.1:6379> SMEMBERS set5
1) "ccc"
2) "222"
3) "bbb"
4) "aaa"
5) "111"
127.0.0.1:6379> SISMEMBER set1 1				#SISMEMBER表示判断一个元素是否在集合中
(integer) 0				#返回0表示不存在

127.0.0.1:6379> SISMEMBER set1 aaa
(integer) 1				#返回1表示存在
127.0.0.1:6379> SRANDMEMBER set1				#SRANDMEMBER表示随机取出元素,但不删除
"ccc"

127.0.0.1:6379> SRANDMEMBER set1 2				#2表示随机取出2个元素
1) "ccc"
2) "222"

127.0.0.1:6379> SMEMBERS set1
1) "bbb"
2) "aaa"
3) "222"
4) "ccc"
127.0.0.1:6379> ZADD zset1 11 123				#ZADD表示添加元素
(integer) 1

127.0.0.1:6379> ZADD zset1 2 lab
(integer) 1

127.0.0.1:6379> ZADD zset1 25 k
(integer) 1

127.0.0.1:6379> ZRANGE zset1 0 -1				#ZRANGE表示查看元素,按顺序显示,0表示第一位,-1表示最后一位
1) "lab"
2) "123"
3) "k"
127.0.0.1:6379> ZREM zset1 123				#ZREM表示删除元素,123为具体的值(输入score(11)则不对)
(integer) 1

127.0.0.1:6379> ZRANGE zset1 0 -1
1) "lab"
2) "k"
127.0.0.1:6379> ZADD zset1 9 la
(integer) 1

127.0.0.1:6379> ZADD zset1 100 sss
(integer) 1

127.0.0.1:6379> ZRANGE zset1 0 -1
1) "lab"
2) "la"
3) "k"
4) "sss"

127.0.0.1:6379> ZRANK zset1 k				#ZRANK返回元素的索引值,索引值从0开始,按sore正向排序,score即value前面的值,如la的sore是9,sss的sore为100
(integer) 2
127.0.0.1:6379> ZREVRANK zset1 k				#ZREVRANK返回元素的索引值,索引值从0开始,按score反向排序
(integer) 1
127.0.0.1:6379> ZREVRANGE zset1 0 -1				#ZREVRANGE表示反序排序
1) "sss"
2) "k"
3) "la"
4) "lab"
127.0.0.1:6379> ZCARD zset1				#ZCARD返回元素个数
(integer) 4
127.0.0.1:6379> ZCOUNT zset1 1 10				#ZCOUNT返回score范围中的元素个数,1 10表示范围为1-10
(integer) 2				#1-10的元素个数为2
127.0.0.1:6379> ZRANGEBYSCORE zset1 1 10				#ZRANGEBYSCORE返回score范围中的元素
1) "lab"
2) "la"
127.0.0.1:6379> ZREMRANGEBYRANK zset1 0 1				#ZREMRANGEBYRANK表示删除索引范围中的元素,0 1表示索引从第一位到第二位
(integer) 2

127.0.0.1:6379> ZRANGE zset1 0 -1
1) "k"
2) "sss"
127.0.0.1:6379> ZADD zset1 6 111
(integer) 1

127.0.0.1:6379> ZADD zset1 31 all
(integer) 1

127.0.0.1:6379> ZRANGE zset1 0 -1
1) "111"
2) "k"
3) "all"
4) "sss"

127.0.0.1:6379> ZREMRANGEBYSCORE zset1 1 10				#ZREMRANGEBYSCORE表示删除score(分值)范围中的元素,1 10表示范围为1-10
(integer) 1

127.0.0.1:6379> ZRANGE zset1 0 -1
1) "k"
2) "all"
3) "sss"
127.0.0.1:6379> HSET usera   name lzx				#HSET建立hash
(integer) 1

127.0.0.1:6379> HGET usera name				#HGET查看
"lzx"
127.0.0.1:6379> HMSET userb name lzx age 20 job it				#HMSET批量创建键值对
OK

127.0.0.1:6379> HMGET userb name age job				#HMGET批量查看
1) "lzx"
2) "20"
3) "it"

127.0.0.1:6379> HGETALL userb				#HGETALL查看hash中所有键值对,这样查看也可以
1) "name"
2) "lzx"
3) "age"
4) "20"
5) "job"
6) "it"
127.0.0.1:6379> HDEL userb age				#HDEL删除对应的键值对
(integer) 1

127.0.0.1:6379> HGETALL userb
1) "name"
2) "lzx"
3) "job"
4) "it"				#age对应的键值对消失
127.0.0.1:6379> HKEYS userb				#HKEYS显示hash中所有的key
1) "name"
2) "job"
127.0.0.1:6379> HVALS userb				#HVALS显示hash中所有的value
1) "lzx"
2) "it"
127.0.0.1:6379> HLEN userb				#HLEN查看hash中有多少个键值对
(integer) 2
127.0.0.1:6379> KEYS *				#KEYS列出redis中所有的key
 1) "key1"
 2) "k2"
 3) "set3"
 4) "k3"
 5) "seta"
 6) "mykey"
 7) "key2"
 8) "set5"
 9) "zset1"
10) "k1"
11) "set2"
12) "set4"
13) "list1"
14) "userb"
15) "usera"
16) "hash1"
17) "set1"
18) "list2"
127.0.0.1:6379> KEYS my*				#模糊匹配
1) "mykey"
127.0.0.1:6379> EXISTS key1				#EXISTS查看是否存在某个键,存在返回1,不存在返回0
(integer) 1
127.0.0.1:6379> DEL key1				#DEL删除某个键
(integer) 1

127.0.0.1:6379> EXISTS key1
(integer) 0
127.0.0.1:6379> EXPIRE k2 10				#EXPIRE给某个键设置过期时间,10表示10s
(integer) 1

127.0.0.1:6379> GET k2
"2"

127.0.0.1:6379> GET k2				#过10s之后查看,k2的value为空
(nil)
127.0.0.1:6379> EXPIRE key2 100
(integer) 1

127.0.0.1:6379> TTL key2				#TTL查看键的过期时间
(integer) 94

127.0.0.1:6379> TTL key2
(integer) 90
127.0.0.1:6379> SELECT 1				#SELECT选择库,总共有16个库,默认为0库
OK

127.0.0.1:6379[1]> KEYS *				#[1]表示现在在1库
(empty list or set)				#1库没有数据

127.0.0.1:6379[1]> SELECT 0
OK

127.0.0.1:6379> KEYS *
 1) "set3"
 2) "k3"
 3) "seta"
 4) "mykey"
 5) "set5"
 6) "zset1"
 7) "k1"
 8) "set2"
 9) "set4"
10) "list1"
11) "userb"
12) "usera"
13) "hash1"
14) "set1"
15) "list2"
127.0.0.1:6379> MOVE set2 1				#MOVE移动数据到另一个库
(integer) 1

127.0.0.1:6379> SELECT 1
OK

127.0.0.1:6379[1]> KEYS *
1) "set2"
127.0.0.1:6379> EXPIRE set1 100
(integer) 1

127.0.0.1:6379> TTL set1
(integer) 94

127.0.0.1:6379> PERSIST set1				#PERSIST取消过期时间
(integer) 1

127.0.0.1:6379> TTL set1
(integer) -1				#-1表示没有过期时间,即永不过期
127.0.0.1:6379> EXPIRE set1 100
(integer) 1

127.0.0.1:6379> TTL set1
(integer) 94

127.0.0.1:6379> PERSIST set1				#PERSIST取消过期时间
(integer) 1

127.0.0.1:6379> TTL set1
(integer) -1				#-1表示没有过期时间,即永不过期
127.0.0.1:6379> EXPIRE set1 100
(integer) 1

127.0.0.1:6379> TTL set1
(integer) 94

127.0.0.1:6379> PERSIST set1				#PERSIST取消过期时间
(integer) 1

127.0.0.1:6379> TTL set1
(integer) -1				#-1表示没有过期时间,即永不过期
127.0.0.1:6379> EXPIRE set1 100
(integer) 1

127.0.0.1:6379> TTL set1
(integer) 94

127.0.0.1:6379> PERSIST set1				#PERSIST取消过期时间
(integer) 1

127.0.0.1:6379> TTL set1
(integer) -1				#-1表示没有过期时间,即永不过期
127.0.0.1:6379> EXPIRE set1 100
(integer) 1

127.0.0.1:6379> TTL set1
(integer) 94

127.0.0.1:6379> PERSIST set1				#PERSIST取消过期时间
(integer) 1

127.0.0.1:6379> TTL set1
(integer) -1				#-1表示没有过期时间,即永不过期
127.0.0.1:6379> DBSIZE				#DBSIZE返回当前数据库中key的数量
(integer) 14
127.0.0.1:6379> INFO				#返回redis数据库状态信息
# Server
redis_version:4.0.11
redis_git_sha1:00000000
redis_git_dirty:0
redis_build_id:f1b08454f8b4e56c
redis_mode:standalone
os:Linux 3.10.0-693.el7.x86_64 x86_64
arch_bits:64
multiplexing_api:epoll
atomicvar_api:atomic-builtin
gcc_version:4.8.5
process_id:36457
run_id:d580da83e18929d6b37d826991dc705172de928c
tcp_port:6379
uptime_in_seconds:24729
uptime_in_days:0
hz:10
lru_clock:3752638
executable:/usr/local/src/redis-4.0.11/redis-server
config_file:/etc/redis.conf

# Clients
connected_clients:1
client_longest_output_list:0
client_biggest_input_buf:0
blocked_clients:0

# Memory
used_memory:851096
used_memory_human:831.15K
used_memory_rss:7970816
used_memory_rss_human:7.60M
used_memory_peak:851096
used_memory_peak_human:831.15K
used_memory_peak_perc:100.08%
used_memory_overhead:837134
used_memory_startup:786584
used_memory_dataset:13962
used_memory_dataset_perc:21.64%
total_system_memory:3958075392
total_system_memory_human:3.69G
used_memory_lua:37888
used_memory_lua_human:37.00K
maxmemory:0
maxmemory_human:0B
maxmemory_policy:noeviction
mem_fragmentation_ratio:9.36
mem_allocator:jemalloc-4.0.3
active_defrag_running:0
lazyfree_pending_objects:0

# Persistence
loading:0
rdb_changes_since_last_save:3
rdb_bgsave_in_progress:0
rdb_last_save_time:1530478637
rdb_last_bgsave_status:ok
rdb_last_bgsave_time_sec:0
rdb_current_bgsave_time_sec:-1
rdb_last_cow_size:6545408
aof_enabled:1
aof_rewrite_in_progress:0
aof_rewrite_scheduled:0
aof_last_rewrite_time_sec:-1
aof_current_rewrite_time_sec:-1
aof_last_bgrewrite_status:ok
aof_last_write_status:ok
aof_last_cow_size:0
aof_current_size:3560
aof_base_size:0
aof_pending_rewrite:0
aof_buffer_length:0
aof_rewrite_buffer_length:0
aof_pending_bio_fsync:0
aof_delayed_fsync:0

# Stats
total_connections_received:2
total_commands_processed:211
instantaneous_ops_per_sec:0
total_net_input_bytes:7390
total_net_output_bytes:24177
instantaneous_input_kbps:0.00
instantaneous_output_kbps:0.00
rejected_connections:0
sync_full:0
sync_partial_ok:0
sync_partial_err:0
expired_keys:4
expired_stale_perc:0.00
expired_time_cap_reached_count:0
evicted_keys:0
keyspace_hits:97
keyspace_misses:10
pubsub_channels:0
pubsub_patterns:0
latest_fork_usec:927
migrate_cached_sockets:0
slave_expires_tracked_keys:0
active_defrag_hits:0
active_defrag_misses:0
active_defrag_key_hits:0
active_defrag_key_misses:0

# Replication
role:master
connected_slaves:0
master_replid:91c7968e04d1852516098681ea3bbd3e052b4252
master_replid2:0000000000000000000000000000000000000000
master_repl_offset:0
second_repl_offset:-1
repl_backlog_active:0
repl_backlog_size:1048576
repl_backlog_first_byte_offset:0
repl_backlog_histlen:0

# CPU
used_cpu_sys:17.50
used_cpu_user:8.47
used_cpu_sys_children:0.32
used_cpu_user_children:0.00

# Cluster
cluster_enabled:0

# Keyspace
db0:keys=14,expires=0,avg_ttl=0
db1:keys=1,expires=0,avg_ttl=0
127.0.0.1:6379> FLUSHDB				#FLUSHDB清空当前数据库中所有的key
OK

127.0.0.1:6379> KEYS *
(empty list or set)
127.0.0.1:6379> BGSAVE				#保存数据到磁盘,在后台运行
Background saving started
127.0.0.1:6379> save				#保存数据到磁盘,在前台运行
OK
127.0.0.1:6379> CONFIG GET * #获取所有配置参数
127.0.0.1:6379> CONFIG GET dir				#获取配置参数
1) "dir"
2) "/data/redis"

127.0.0.1:6379> CONFIG GET dbfilename
1) "dbfilename"
2) "dump.rdb"
127.0.0.1:6379> CONFIG SET timeout 100				#更改配置参数
OK

127.0.0.1:6379> CONFIG GET timeout
1) "timeout"
2) "100"
# vim /etc/redis.conf
bind 127.0.0.1 192.168.1.1				#设置内网IP,可以是多个,用空格分隔
# vim /etc/redis.conf
port 16000				#不要设置为默认端口6379
# vim /etc/redis.conf
requirepass 123123				#密码为123123

# redis-cli -a '123123'				#重启服务之后再次登录redis
# vim /etc/redis.conf
rename-command CONFIG ""				#保存退出重启服务
编辑配置文件
# vim /etc/redis.conf				#默认配置
slowlog-log-slower-than 10000             //单位:μs,即10ms
slowlog-max-len 128
针对慢查询日志,可以设置两个参数,一个是执行时长,另一个是慢查询日志的长度。当一个新的命令被写入日志时,最老的一条会从命令日志队列中移除出去。
redis命令行执行
slowlog get				#列出所有的慢查询日志

slowlog get 2				#只列出2条

slowlog len				#查看慢查询日志条数
1. 多个redis节点网络互联,数据共享
2. 所有的节点都是一主一从(也可以是一主多从),其中从不提供服务,仅作为备用
3. 不支持同时处理多个key(如MSET/MGET),因为redis需要把key均匀分布在各个节点上,
并发量很高的情况下同时创建key-value会降低性能并导致不可预测的行为
4. 支持在线增加、删除节点
5. 客户端可以连任何一个主节点进行读写
集群模式的搭建,均采用Dokcer镜像模拟集群
Redis有三种集群模式,分别是:
主从模式是三种模式中最简单的,在主从复制中,数据库分为两类:主数据库(master)和从数据库(slave)。
主从复制特点:
主数据库可以进行读写操作,当读写操作导致数据变化时会自动将数据同步给从数据库
从数据库一般都是只读的,并且接收主数据库同步过来的数据
一个master可以拥有多个slave,但是一个slave只能对应一个master
slave挂了不影响其他slave的读和master的读和写,重新启动后会将数据从master同步过来
master挂了以后,不影响slave的读,但redis不再提供写服务,master重启后redis将重新对外提供写服务
master挂了以后,不会在slave节点中重新选一个master
主从复制工作机制:
当slave启动后,主动向master发送SYNC命令。master接收到SYNC命令后在后台保存快照(RDB持久化)和缓存保存快照这段时间的命令,然后将保存的快照文件和缓存的命令发送给slave。slave接收到快照文件和命令后加载快照文件和缓存的执行命令。
复制初始化后,master每次接收到的写命令都会同步发送给slave,保证主从数据一致性。
主从复制安全机制:
客户端访问master需要密码
启动slave需要密码,在配置文件中配置即可
客户端访问slave不需要密码
主从复制缺点:
master节点在主从模式中唯一,若master挂掉,则redis无法对外提供写服务。
搭建步骤:
创建docker自定义网段:
$ docker network create --driver=bridge --subnet=172.20.0.0/16 redisnetwork
环境准备:
master节点 172.20.0.2
slave节点 172.20.0.3
slave节点 172.20.0.4
创建集群目录:
$ mkdir -p {6100,6200,6300}
redis配置文件下载地址:
$ wget http://download.redis.io/redis-stable/redis.conf
编辑master节点172.20.0.2配置文件:
$ vim redis.conf

# 监听ip,多个ip用空格分隔
bind 172.20.0.2

# 端口
port 6100

# 关闭自我保护
protected-mode no

# 允许后台启动
daemonize yes

# 日志路径
logfile "/usr/local/redis/redis.log"

# 数据库备份文件存放目录
dir /data/redis

# slave连接master密码,master可省略
masterauth root

# 设置master连接密码,slave可省略
requirepass root

# 在/data/redis/目录生成appendonly.aof文件,将每一次写操作请求都追加到appendonly.aof 文件中
appendonly yes
$ vim Dockerfile

FROM docker.io/redis

# 复制上一步修改的配置文件到redis中
COPY redis.conf /usr/local/etc/redis/redis.conf

# 修改文件权限,后面设置密码可以通过config rewrite重写
RUN chmod 777 /usr/local/etc/redis/redis.conf

# Redis客户端连接端口
EXPOSE 6100

# 集群总线端口
#EXPOSE 16381

# 启动redis服务
CMD [ "redis-server", "/usr/local/etc/redis/redis.conf" ]
编辑slave节点172.20.0.3配置文件:
$ vim redis.conf

# 监听ip,多个ip用空格分隔
bind 172.20.0.3

# 端口
port 6200

# 关闭自我保护
protected-mode no

# 允许后台启动
daemonize yes

# 日志路径
logfile "/usr/local/redis/redis.log"

# 数据库备份文件存放目录
dir /data/redis

# slave连接master密码,master可省略
masterauth root

# 设置master连接密码,slave可省略
requirepass root

# 在/data/redis/目录生成appendonly.aof文件,将每一次写操作请求都追加到appendonly.aof 文件中
appendonly yes
$ vim Dockerfile

FROM docker.io/redis

# 复制上一步修改的配置文件到redis中
COPY redis.conf /usr/local/etc/redis/redis.conf

# 修改文件权限,后面设置密码可以通过config rewrite重写
RUN chmod 777 /usr/local/etc/redis/redis.conf

# Redis客户端连接端口
EXPOSE 6200

# 集群总线端口
#EXPOSE 16381

# 启动redis服务
CMD [ "redis-server", "/usr/local/etc/redis/redis.conf" ]
编辑slave节点172.20.0.4配置文件:
$ vim redis.conf

# 监听ip,多个ip用空格分隔
bind 172.20.0.4

# 端口
port 6300

# 关闭自我保护
protected-mode no

# 允许后台启动
daemonize yes

# 日志路径
logfile "/usr/local/redis/redis.log"

# 数据库备份文件存放目录
dir /data/redis

# slave连接master密码,master可省略
masterauth root

# 设置master连接密码,slave可省略
requirepass root

# 在/data/redis/目录生成appendonly.aof文件,将每一次写操作请求都追加到appendonly.aof 文件中
appendonly yes
$ vim Dockerfile

FROM docker.io/redis

# 复制上一步修改的配置文件到redis中
COPY redis.conf /usr/local/etc/redis/redis.conf

# 修改文件权限,后面设置密码可以通过config rewrite重写
RUN chmod 777 /usr/local/etc/redis/redis.conf

# Redis客户端连接端口
EXPOSE 6300

# 集群总线端口
#EXPOSE 16381

# 启动redis服务
CMD [ "redis-server", "/usr/local/etc/redis/redis.conf" ]
编辑docker-compose文件:
$ vim redis.yml

version: '3'
services:
  redis-master-slave-one:
    hostname: redis-master-slave-one
    container_name: redis-master-slave-one
    build: ./6100
    volumes:
     - /data/redis-cluster/6100:/data
     - /etc/localtime:/etc/localtime
     - /etc/timezone:/etc/timezone
    ports:
     - 6100:6100
    networks:
      default:
        ipv4_address: 172.20.0.2
    restart: always
    environment:
      - SET_CONTAINER_TIMEZONE=true
      - CONTAINER_TIMEZONE=Asia/Shanghai
    privileged: true
    restart: always

  redis-master-slave-two:
    hostname: redis-master-slave-two
    container_name: redis-master-slave-two
    build: ./6200
    volumes:
     - /data/redis-cluster/6200:/data
     - /etc/localtime:/etc/localtime
     - /etc/timezone:/etc/timezone
    ports:
     - 6200:6200
    networks:
      default:
        ipv4_address: 172.20.0.3
    restart: always
    environment:
      - SET_CONTAINER_TIMEZONE=true
      - CONTAINER_TIMEZONE=Asia/Shanghai
    privileged: true
    restart: always

  redis-master-slave-three:
    hostname: redis-master-slave-three
    container_name: redis-master-slave-three
    build: ./6300
    volumes:
     - /data/redis-cluster/6300:/data
     - /etc/localtime:/etc/localtime
     - /etc/timezone:/etc/timezone
    ports:
     - 6300:6300
    networks:
      default:
        ipv4_address: 172.20.0.4
    restart: always
    environment:
      - SET_CONTAINER_TIMEZONE=true
      - CONTAINER_TIMEZONE=Asia/Shanghai
    privileged: true
    restart: always

networks:
  default:
    external:
      name: redisnetwork
编辑构建脚本:
$ vim build.sh

#! /bin/bash

docker-compose -f redis.yml stop

docker-compose -f redis.yml rm --force

docker rmi redis-mater-salve_redis-master-slave-one
docker rmi redis-mater-salve_redis-master-slave-two
docker rmi redis-mater-salve_redis-master-slave-three

docker-compose -f redis.yml up -d
执行构建脚本:
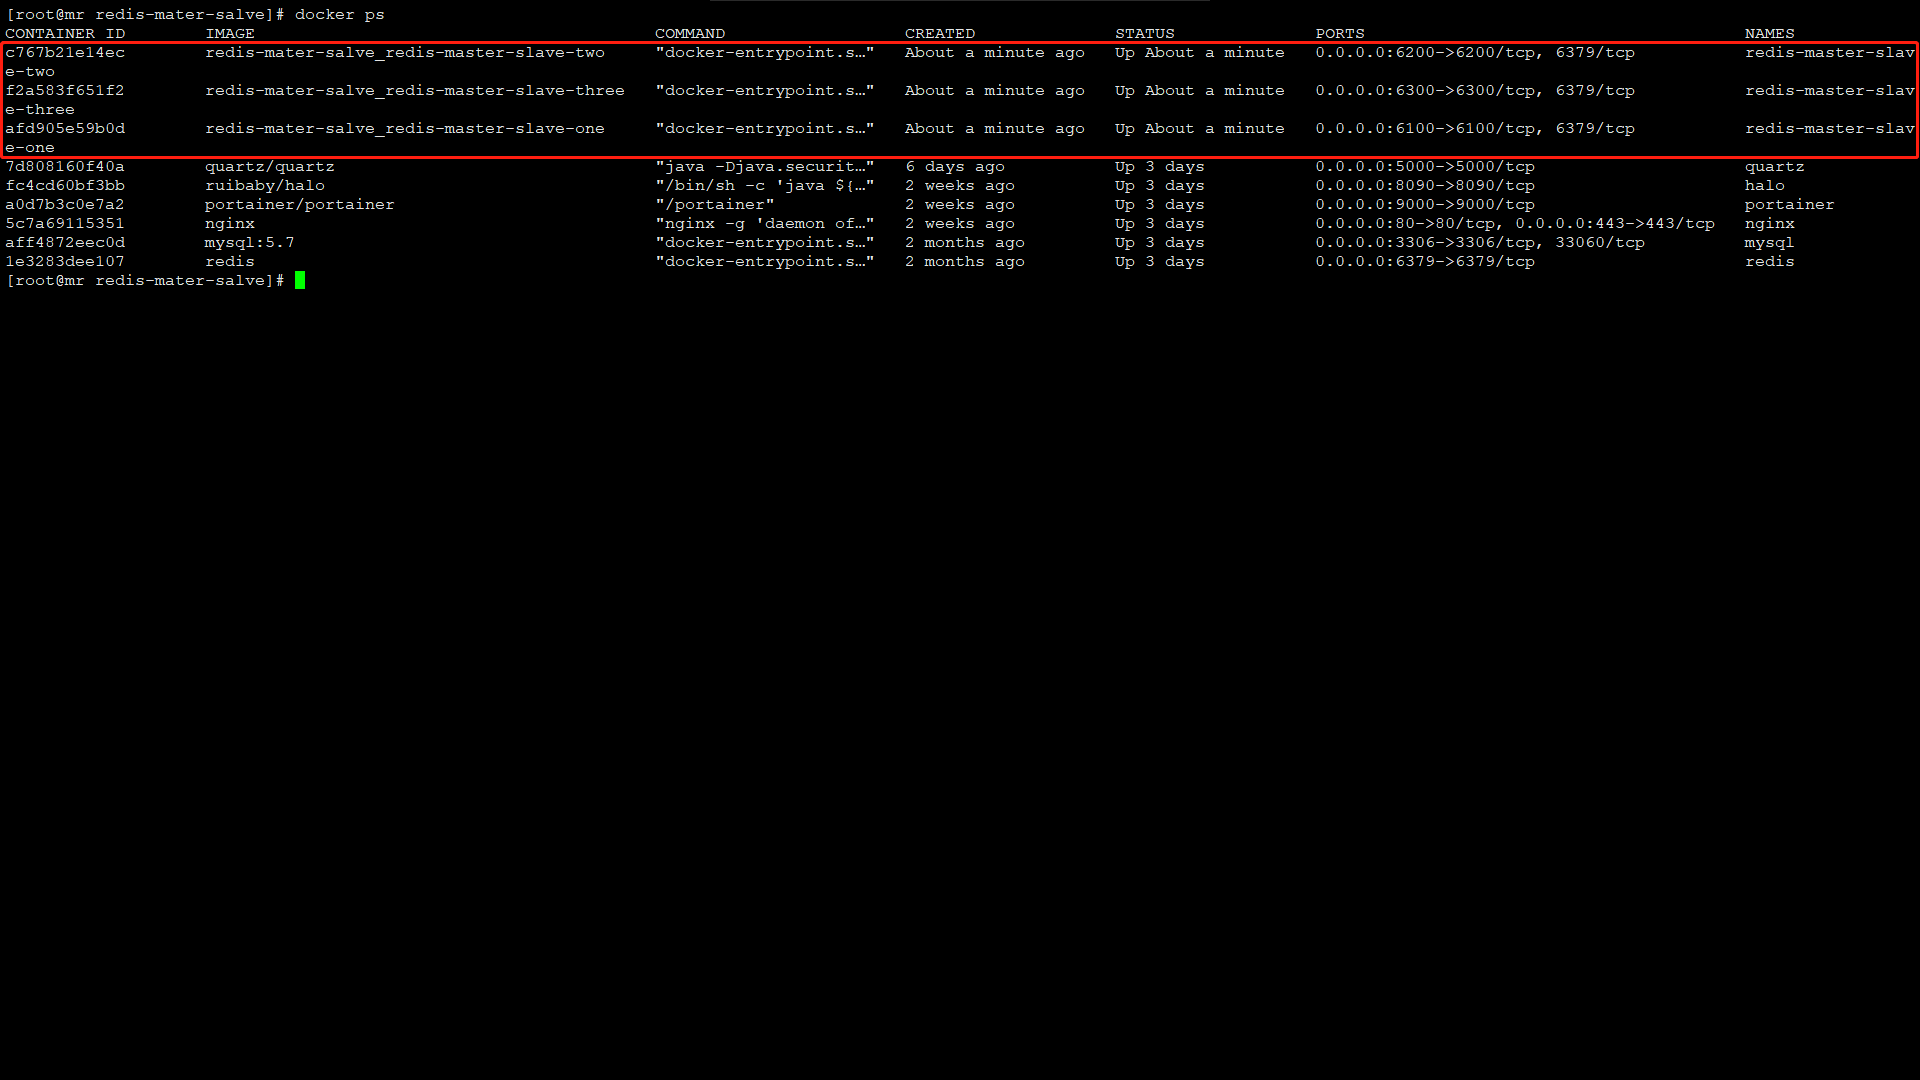
$ sh build.sh
成功构建显示如下:
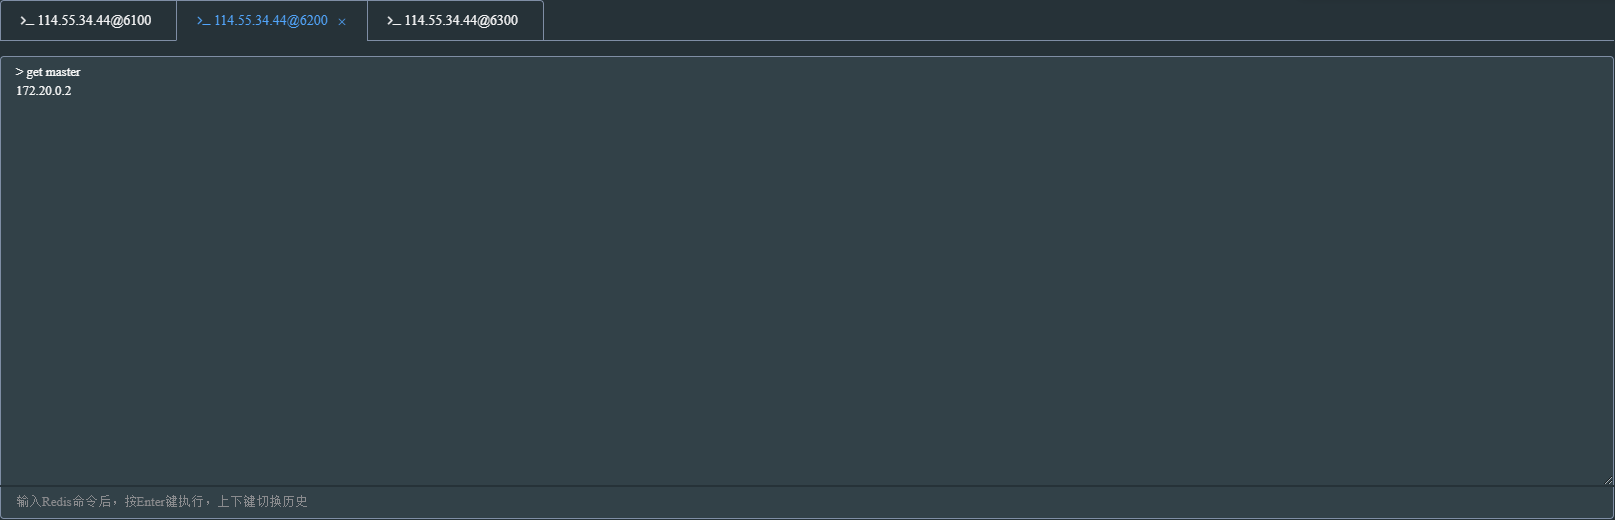
查看集群状态:
info replication

数据演示:
在master写入数据,很快就会同步到salve节点,slave只能读取master写入的数据,无法写入数据


主从模式的弊端就是不具备高可用性,当master挂掉以后,Redis将不能再对外提供写入操作,因此sentinel应运而生
当使用sentinel模式的时候,客户端就不要直接连接Redis,而是连接sentinel的ip和port,由sentinel来提供具体的可提供服务的Redis实现,这样当master节点挂掉以后,sentinel就会感知并将新的master节点提供给使用者。
sentinel特点:
sentinel模式是建立在主从模式的基础上,如果只有一个Redis节点,sentinel就没有任何意义
当master挂了以后,sentinel会在slave中选择一个做为master,并修改它们的配置文件,其他slave的配置文件也会被修改,比如slaveof属性会指向新的master
当master重新启动后,它将不再是master而是做为slave接收新的master的同步数据
sentinel因为也是一个进程有挂掉的可能,所以sentinel也会启动多个形成一个sentinel集群
多sentinel配置的时候,sentinel之间也会自动监控
当主从模式配置密码时,sentinel也会同步将配置信息修改到配置文件中,不需要担心
一个sentinel或sentinel集群可以管理多个主从Redis,多个sentinel也可以监控同一个redis
sentinel最好不要和Redis部署在同一台机器,不然Redis的服务器挂了以后,sentinel也挂了
sentinel工作机制:
每个sentinel以每秒钟一次的频率向它所知的master,slave以及其他sentinel实例发送一个 PING 命令
如果一个实例距离最后一次有效回复 PING 命令的时间超过 down-after-milliseconds 选项所指定的值, 则这个实例会被sentinel标记为主观下线。
如果一个master被标记为主观下线,则正在监视这个master的所有sentinel要以每秒一次的频率确认master的确进入了主观下线状态
当有足够数量的sentinel(大于等于配置文件指定的值)在指定的时间范围内确认master的确进入了主观下线状态, 则master会被标记为客观下线
在一般情况下, 每个sentinel会以每 10 秒一次的频率向它已知的所有master,slave发送 INFO 命令
当master被sentinel标记为客观下线时,sentinel向下线的master的所有slave发送 INFO 命令的频率会从 10 秒一次改为 1 秒一次
若没有足够数量的sentinel同意master已经下线,master的客观下线状态就会被移除; 若master重新向sentinel的 PING 命令返回有效回复,master的主观下线状态就会被移除
环境准备:
master节点:172.20.0.5 sentinel端口:26379
master节点:172.20.0.6 sentinel端口:26380
master节点:172.20.0.7 sentinel端口:26381
创建集群目录
$ mkdir -p {7100,7200,7300}
sentinel配置文件下载地址
$ wget $ wget http://download.redis.io/redis-stable/sentinel.conf
编辑master节点172.20.0.5配置文件
$ vim redis.conf

# 监听ip,多个ip用空格分隔
bind 172.20.0.5

# 端口
port 7100

# 关闭自我保护
protected-mode no

# 允许后台启动
daemonize yes

# 日志路径
logfile "/usr/local/redis/redis.log"

# 数据库备份文件存放目录
dir /data/redis

# slave连接master密码,master可省略
masterauth root

# 设置master连接密码,slave可省略
requirepass root

# 在/data/redis/目录生成appendonly.aof文件,将每一次写操作请求都追加到appendonly.aof 文件中
appendonly yes
$ vim sentinel.conf

# 指定绑定ip
bind 0.0.0.0

# 关闭自我保护
protected-mode no

# 允许后台启动
daemonize yes

# 指定sentinel日志目录
logfile "/usr/local/redis/sentinel.log"

# sentinel工作目录
dir "/usr/local/redis/sentinel"

# 判断master失效至少需要2个sentinel同意,建议设置为n/2+1,n为sentinel个数
sentinel monitor mymaster 172.20.0.5 7100 2

# 指定master节点密码
sentinel auth-pass mymaster root

# 判断master主观下线时间,默认30s
sentinel down-after-milliseconds mymaster 30000
$ vim Dockerfile

FROM docker.io/redis

# 复制上一步修改的配置文件到redis中
COPY sentinel.conf /usr/local/etc/redis/sentinel.conf
COPY redis.conf /usr/local/etc/redis/redis.conf
COPY sentinel.logs /usr/local/etc/redis/sentinel.logs

# 修改文件权限,后面设置密码可以通过config rewrite重写
RUN chmod 777 /usr/local/etc/redis/sentinel.conf
RUN chmod 777 /usr/local/etc/redis/redis.conf

# 端口
EXPOSE 7100 26379

# 启动redis服务和sentinel服务
ENTRYPOINT ["sh","./entrypoint.sh"]
$ vim entrypoint.sh

echo '执行 redis-server'
redis-server /usr/local/etc/redis/redis.conf

echo '执行 redis-sentinel'
redis-sentinel /usr/local/etc/redis/sentinel.conf
编辑slave节点172.20.0.6配置文件
$ vim redis.conf

# 监听ip,多个ip用空格分隔
bind 172.20.0.6

# 端口
port 7200

# 关闭自我保护
protected-mode no

# 允许后台启动
daemonize yes

# 日志路径
logfile "/usr/local/redis/redis.log"

# 数据库备份文件存放目录
dir /data/redis

# slave连接master密码,master可省略
masterauth root

# 设置master连接密码,slave可省略
requirepass root

# 在/data/redis/目录生成appendonly.aof文件,将每一次写操作请求都追加到appendonly.aof 文件中
appendonly yes
$ vim sentinel.conf

# 指定绑定ip
bind 0.0.0.0

# 关闭自我保护
protected-mode no

# 允许后台启动
daemonize yes

# 指定sentinel日志目录
logfile "/usr/local/redis/sentinel.log"

# sentinel工作目录
dir "/usr/local/redis/sentinel"

# 判断master失效至少需要2个sentinel同意,建议设置为n/2+1,n为sentinel个数
sentinel monitor mymaster 172.20.0.5 7100 2

# 指定master节点密码
sentinel auth-pass mymaster root

# 判断master主观下线时间,默认30s
sentinel down-after-milliseconds mymaster 30000
$ vim Dockerfile

FROM docker.io/redis

# 复制上一步修改的配置文件到redis中
COPY sentinel.conf /usr/local/etc/redis/sentinel.conf
COPY redis.conf /usr/local/etc/redis/redis.conf
COPY sentinel.logs /usr/local/etc/redis/sentinel.logs

# 修改文件权限,后面设置密码可以通过config rewrite重写
RUN chmod 777 /usr/local/etc/redis/sentinel.conf
RUN chmod 777 /usr/local/etc/redis/redis.conf

# 端口
EXPOSE 7200 26380

# 启动redis服务和sentinel服务
ENTRYPOINT ["sh","./entrypoint.sh"]
$ vim entrypoint.sh

echo '执行 redis-server'
redis-server /usr/local/etc/redis/redis.conf

echo '执行 redis-sentinel'
redis-sentinel /usr/local/etc/redis/sentinel.conf
编辑slave节点172.20.0.7配置文件
$ vim redis.conf

# 监听ip,多个ip用空格分隔
bind 172.20.0.7

# 端口
port 7300

# 关闭自我保护
protected-mode no

# 允许后台启动
daemonize yes

# 日志路径
logfile "/usr/local/redis/redis.log"

# 数据库备份文件存放目录
dir /data/redis

# slave连接master密码,master可省略
masterauth root

# 设置master连接密码,slave可省略
requirepass root

# 在/data/redis/目录生成appendonly.aof文件,将每一次写操作请求都追加到appendonly.aof 文件中
appendonly yes
$ vim sentinel.conf

# 指定绑定ip
bind 0.0.0.0

# 关闭自我保护
protected-mode no

# 允许后台启动
daemonize yes

# 指定sentinel日志目录
logfile "/usr/local/redis/sentinel.log"

# sentinel工作目录
dir "/usr/local/redis/sentinel"

# 判断master失效至少需要2个sentinel同意,建议设置为n/2+1,n为sentinel个数
sentinel monitor mymaster 172.20.0.5 7100 2

# 指定master节点密码
sentinel auth-pass mymaster root

# 判断master主观下线时间,默认30s
sentinel down-after-milliseconds mymaster 30000
$ vim Dockerfile

FROM docker.io/redis

# 复制上一步修改的配置文件到redis中
COPY sentinel.conf /usr/local/etc/redis/sentinel.conf
COPY redis.conf /usr/local/etc/redis/redis.conf
COPY sentinel.logs /usr/local/etc/redis/sentinel.logs

# 修改文件权限,后面设置密码可以通过config rewrite重写
RUN chmod 777 /usr/local/etc/redis/sentinel.conf
RUN chmod 777 /usr/local/etc/redis/redis.conf

# 端口
EXPOSE 7300 26381

# 启动redis服务和sentinel服务
ENTRYPOINT ["sh","./entrypoint.sh"]
$ vim entrypoint.sh

echo '执行 redis-server'
redis-server /usr/local/etc/redis/redis.conf

echo '执行 redis-sentinel'
redis-sentinel /usr/local/etc/redis/sentinel.conf
编辑docker-composer配置文件
$ vim redis.yml

version: '3'
services:
  redis-sentinel-one:
    hostname: redis-sentinel-one
    container_name: redis-sentinel-one
    build: ./7100
    volumes:
     - /data/redis-sentinel/7100:/data
     - /data/redis-sentinel/7100/sentinel.logs:/usr/local/etc/redis/sentinel.logs
     - /etc/localtime:/etc/localtime
     - /etc/timezone:/etc/timezone
    ports:
     - 7100:7100
     - 26379:26379
    networks:
      default:
        ipv4_address: 172.20.0.5
    environment:
      - SET_CONTAINER_TIMEZONE=true
      - CONTAINER_TIMEZONE=Asia/Shanghai
    privileged: true
    restart: always

  redis-sentinel-two:
    hostname: redis-sentinel-two
    container_name: redis-sentinel-two
    build: ./7200
    volumes:
     - /data/redis-sentinel/7200:/data
     - /data/redis-sentinel/7100/sentinel.logs:/usr/local/etc/redis/sentinel.logs
     - /etc/localtime:/etc/localtime
     - /etc/timezone:/etc/timezone
    ports:
     - 7200:7200
     - 26380:26380
    networks:
      default:
        ipv4_address: 172.20.0.6
    environment:
      - SET_CONTAINER_TIMEZONE=true
      - CONTAINER_TIMEZONE=Asia/Shanghai
    privileged: true
    restart: always

  redis-sentinel-three:
    hostname: redis-sentinel-three
    container_name: redis-sentinel-three
    build: ./7300
    volumes:
     - /data/redis-sentinel/7300:/data
     - /data/redis-sentinel/7100/sentinel.logs:/usr/local/etc/redis/sentinel.logs
     - /etc/localtime:/etc/localtime
     - /etc/timezone:/etc/timezone
    ports:
     - 7300:7300
     - 26381:26381
    networks:
      default:
        ipv4_address: 172.20.0.7
    environment:
      - SET_CONTAINER_TIMEZONE=true
      - CONTAINER_TIMEZONE=Asia/Shanghai
    privileged: true
    restart: always

networks:
  default:
    external:
      name: redisnetwork
编辑构建脚本
$ vim build-redis.sh

#! /bin/bash

docker-compose -f redis.yml stop

docker-compose -f redis.yml rm --force

docker rmi redis-sentinel_redis-sentinel-one
docker rmi redis-sentinel_redis-sentinel-two
docker rmi redis-sentinel_redis-sentinel-three

docker-compose -f redis.yml up -d
执行构建脚本
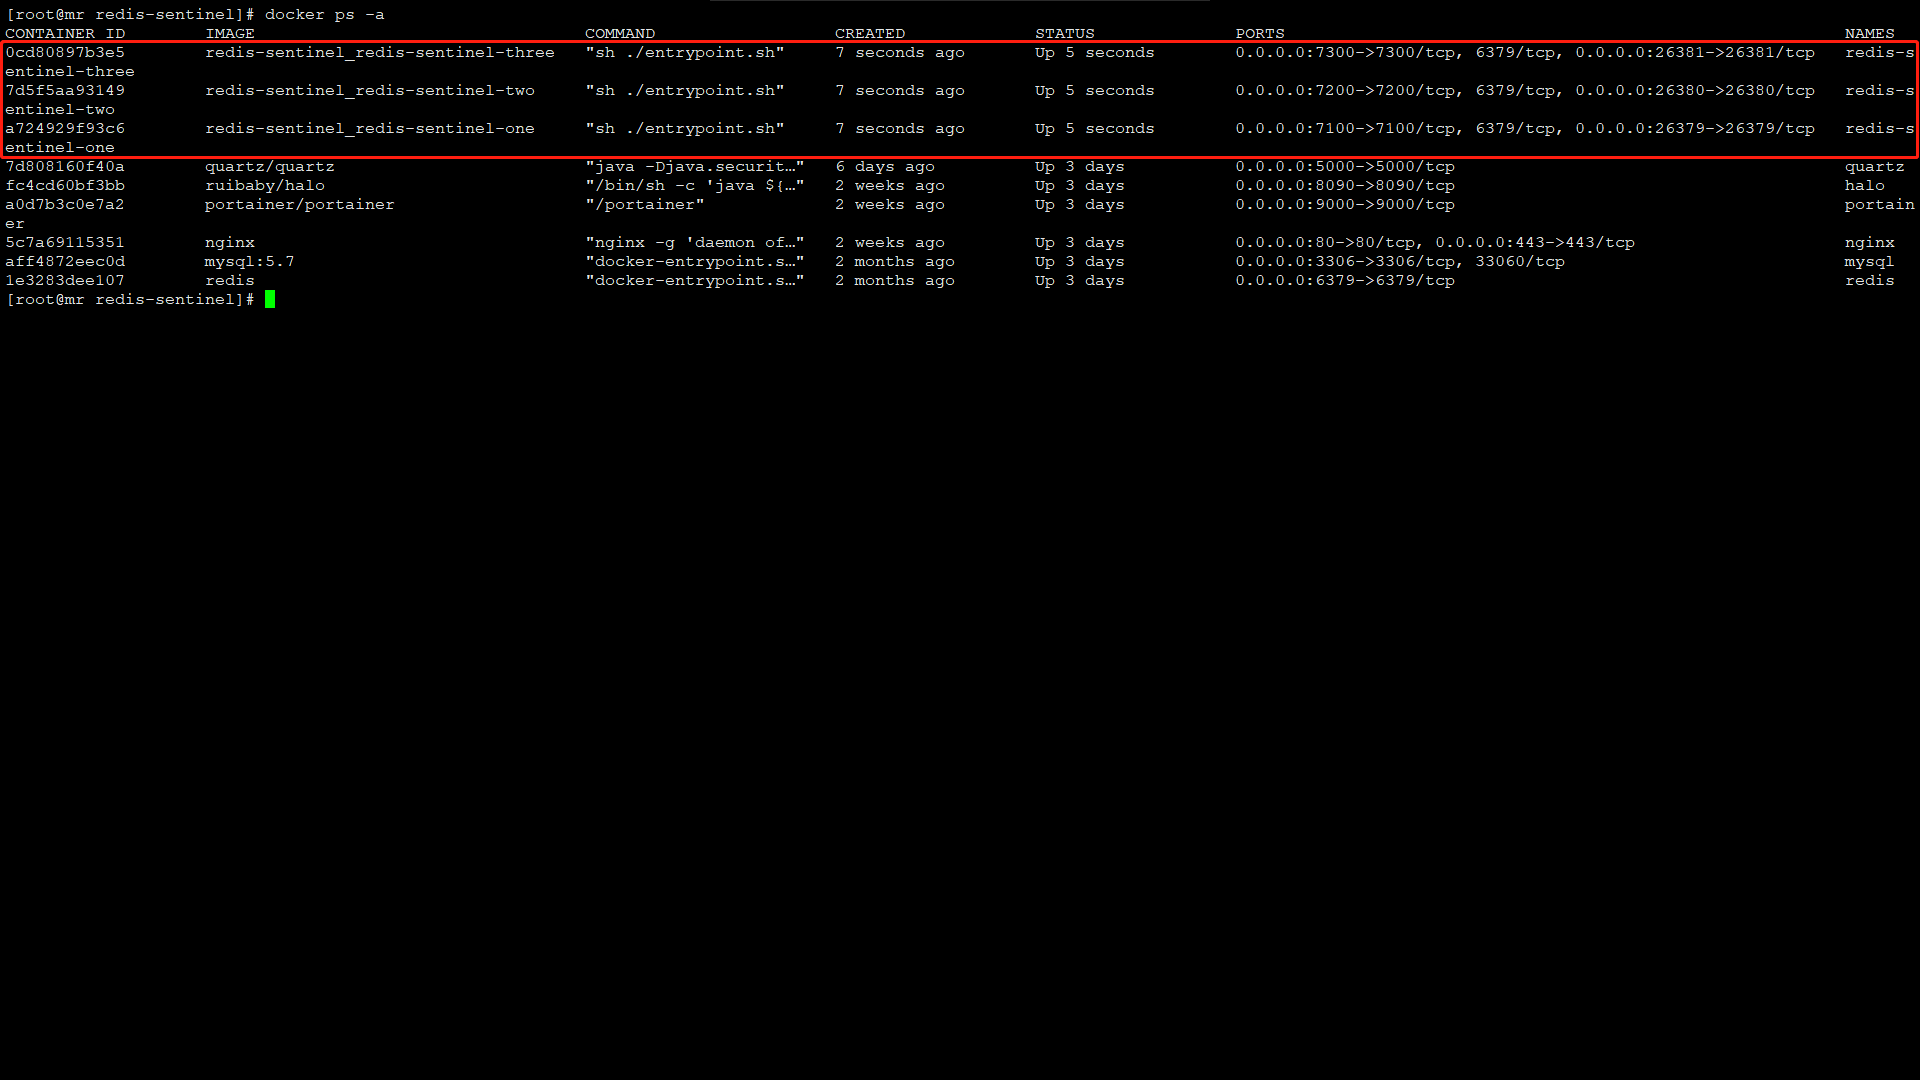
$ sh build-redis.sh
成功构建显示如下:
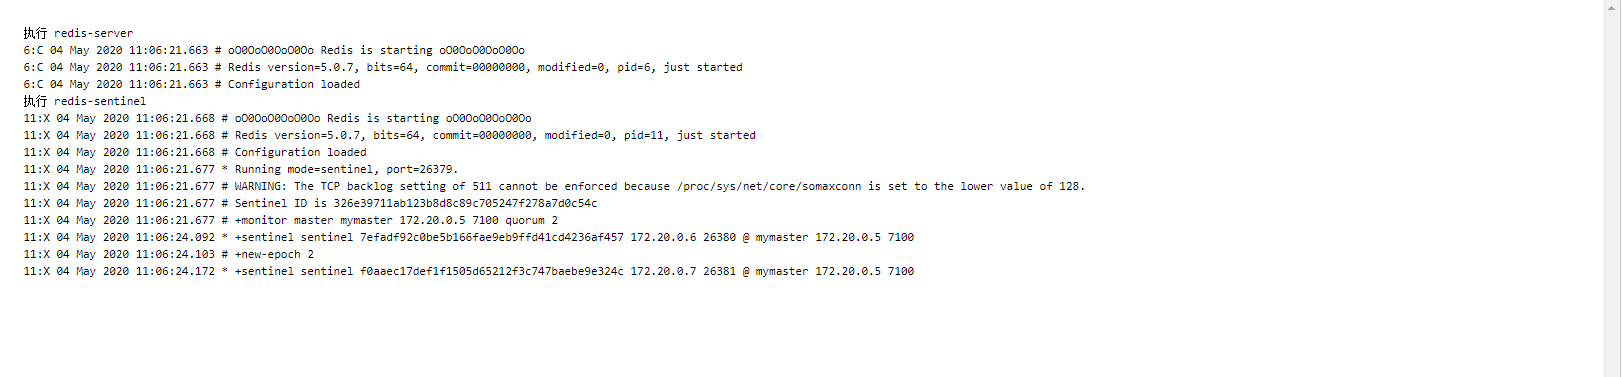
查看运行日志如下:
sentinel模式下事件:
+reset-master :主服务器已被重置。
+slave :一个新的从服务器已经被 Sentinel 识别并关联。
+failover-state-reconf-slaves :故障转移状态切换到了 reconf-slaves 状态。
+failover-detected :另一个 Sentinel 开始了一次故障转移操作,或者一个从服务器转换成了主服务器。
+slave-reconf-sent :领头(leader)的 Sentinel 向实例发送了 SLAVEOF 命令,为实例设置新的主服务器。
+slave-reconf-inprog :实例正在将自己设置为指定主服务器的从服务器,但相应的同步过程仍未完成。
+slave-reconf-done :从服务器已经成功完成对新主服务器的同步。
-dup-sentinel :对给定主服务器进行监视的一个或多个 Sentinel 已经因为重复出现而被移除 —— 当 Sentinel 实例重启的时候,就会出现这种情况。
+sentinel :一个监视给定主服务器的新 Sentinel 已经被识别并添加。
+sdown :给定的实例现在处于主观下线状态。
-sdown :给定的实例已经不再处于主观下线状态。
+odown :给定的实例现在处于客观下线状态。
-odown :给定的实例已经不再处于客观下线状态。
+new-epoch :当前的纪元(epoch)已经被更新。
+try-failover :一个新的故障迁移操作正在执行中,等待被大多数 Sentinel 选中(waiting to be elected by the majority)。
+elected-leader :赢得指定纪元的选举,可以进行故障迁移操作了。
+failover-state-select-slave :故障转移操作现在处于 select-slave 状态 —— Sentinel 正在寻找可以升级为主服务器的从服务器。
no-good-slave :Sentinel 操作未能找到适合进行升级的从服务器。Sentinel 会在一段时间之后再次尝试寻找合适的从服务器来进行升级,又或者直接放弃执行故障转移操作。
selected-slave :Sentinel 顺利找到适合进行升级的从服务器。
failover-state-send-slaveof-noone :Sentinel 正在将指定的从服务器升级为主服务器,等待升级功能完成。
failover-end-for-timeout :故障转移因为超时而中止,不过最终所有从服务器都会开始复制新的主服务器(slaves will eventually be configured to replicate with the new master anyway)。
failover-end :故障转移操作顺利完成。所有从服务器都开始复制新的主服务器了。
+switch-master :配置变更,主服务器的 IP 和地址已经改变。 这是绝大多数外部用户都关心的信息。
+tilt :进入 tilt 模式。
-tilt :退出 tilt 模式。
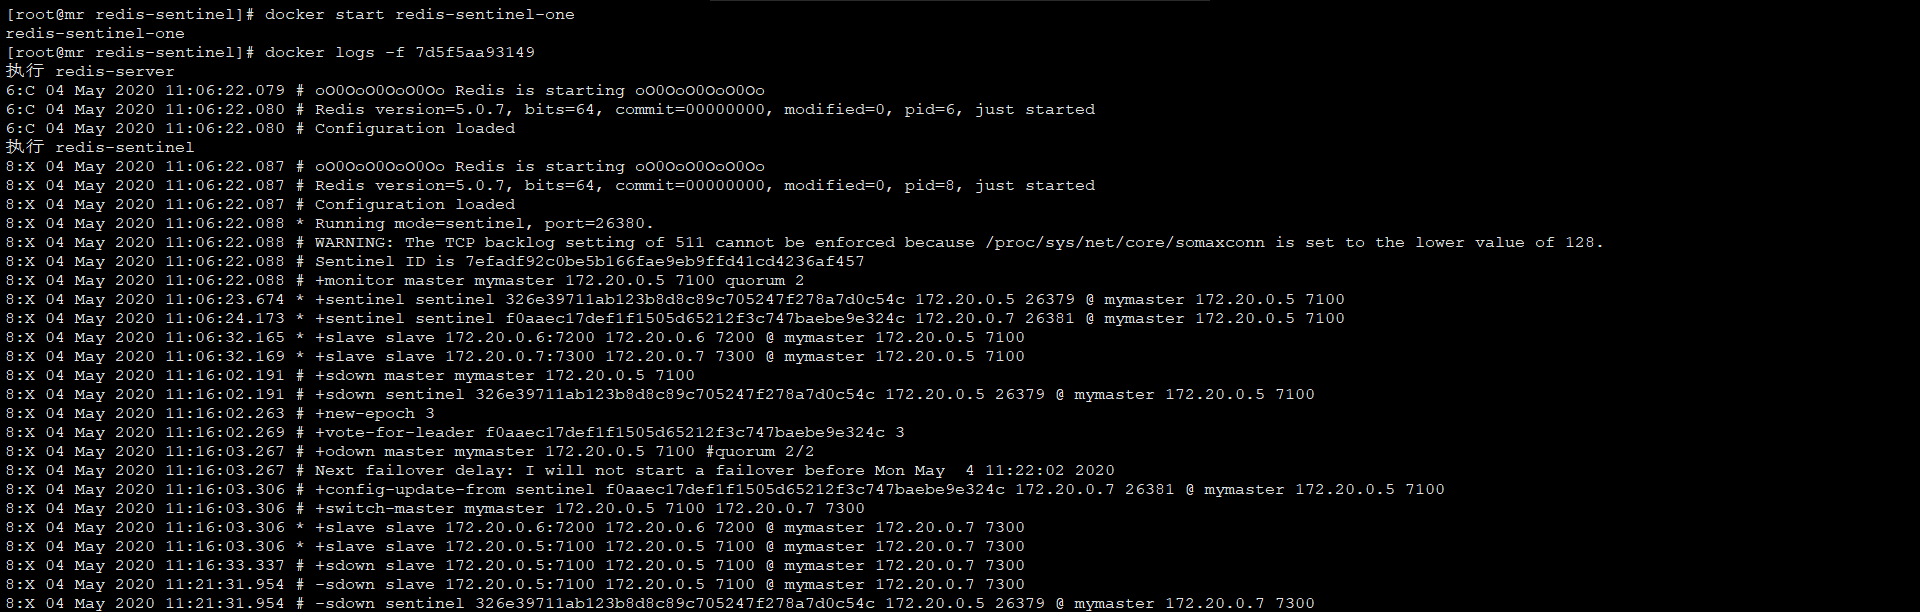
master宕机模拟演示
$ docker stop redis-sentinel-one
172.20.0.5master节点宕机后,master节点已经从172.20.0.5转移到172.20.0.7上


重新启动172.20.0.5节点,也是作为slave加入集群,172.20.0.7仍然是master节点
$ docker start redis-sentinel-one

sentinel模式基本可以满足一般生产的需求,具备高可用性。但是当数据量过大到一台服务器存放不下的情况时,主从模式或sentinel模式就不能满足需求了,这个时候需要对存储的数据进行分片,将数据存储到多个Redis实例中。cluster模式的出现就是为了解决单机Redis容量有限的问题,将Redis的数据根据一定的规则分配到多台机器。
cluster可以说是sentinel和主从模式的结合体,通过cluster可以实现主从和master重选功能,所以如果配置两个副本三个分片的话,就需要六个Redis实例。因为Redis的数据是根据一定规则分配到cluster的不同机器的,当数据量过大时,可以新增机器进行扩容。
使用集群,只需要将redis配置文件中的cluster-enable配置打开即可。每个集群中至少需要三个主数据库才能正常运行,新增节点非常方便。
cluster集群特点:
多个redis节点网络互联,数据共享
所有的节点都是一主一从(也可以是一主多从),其中从不提供服务,仅作为备用
不支持同时处理多个key(如MSET/MGET),因为redis需要把key均匀分布在各个节点上, 并发量很高的情况下同时创建key-value会降低性能并导致不可预测的行为
支持在线增加、删除节点
客户端可以连接任何一个主节点进行读写
环境准备:
172.20.0.2 端口:6100
172.20.0.3 端口:6200
172.20.0.4 端口:6300
172.20.0.5 端口:6400
172.20.0.6 端口:6500
172.20.0.7 端口:6600
创建集群工作目录:
$ mkdir -p {6100,6200,6300,6400,6500,6600}
编辑172.20.0.2配置文件
$ vim redis.conf

# 绑定IP地址
bind 172.20.0.2

# 端口
port 6100

# 允许后台启动
daemonize yes

# pid进程目录
pidfile "/var/run/redis_7001.pid"

# 日志目录
logfile "/usr/local/redis/cluster/redis_7001.log"

# redis工作目录
dir "/data/redis/cluster/redis_7001"

#replicaof 192.168.30.129 6379

# master节点密码
masterauth 123456

# 访问密码
requirepass 123456

# 开启appendonly
appendonly yes

# 开启cluster集群模式
cluster-enabled yes

# cluster配置文件
cluster-config-file nodes_7001.conf

# cluster延迟时间
cluster-node-timeout 15000
$ vim Dockerfile


FROM docker.io/redis

# 复制上一步修改的配置文件到redis中
COPY redis.conf /usr/local/etc/redis/redis.conf

# 修改文件权限,后面设置密码可以通过config rewrite重写
RUN chmod 777 /usr/local/etc/redis/redis.conf

# Redis客户端连接端口
EXPOSE 6100

# 集群总线端口
# EXPOSE 16381

# 启动redis服务
CMD [ "redis-server", "/usr/local/etc/redis/redis.conf" ]
$ vim redis.yml

version: '3'
services:
  redis-cluster-one:
    hostname: redis-cluster-one
    container_name: redis-cluster-one
    build: ./6100
    volumes:
     - /data/redis-cluster/6100:/data
     - /etc/localtime:/etc/localtime
     - /etc/timezone:/etc/timezone
    ports:
     - 6100:6100
    networks:
      default:
        ipv4_address: 172.20.0.2
    restart: always
    environment:
      - SET_CONTAINER_TIMEZONE=true
      - CONTAINER_TIMEZONE=Asia/Shanghai
    privileged: true
    restart: always

  redis-cluster-two:
    hostname: redis-cluster-two
    container_name: redis-cluster-two
    build: ./6200
    volumes:
     - /data/redis-cluster/6200:/data
     - /etc/localtime:/etc/localtime
     - /etc/timezone:/etc/timezone
    ports:
     - 6200:6200
    networks:
      default:
        ipv4_address: 172.20.0.3
    restart: always
    environment:
      - SET_CONTAINER_TIMEZONE=true
      - CONTAINER_TIMEZONE=Asia/Shanghai
    privileged: true
    restart: always

  redis-cluster-three:
    hostname: redis-cluster-three
    container_name: redis-cluster-three
    build: ./6300
    volumes:
     - /data/redis-cluster/6300:/data
     - /etc/localtime:/etc/localtime
     - /etc/timezone:/etc/timezone
    ports:
     - 6300:6300
    networks:
      default:
        ipv4_address: 172.20.0.4
    restart: always
    environment:
      - SET_CONTAINER_TIMEZONE=true
      - CONTAINER_TIMEZONE=Asia/Shanghai
    privileged: true
    restart: always

  redis-cluster-four:
    hostname: redis-cluster-four
    container_name: redis-cluster-four
    build: ./6400
    volumes:
     - /data/redis-cluster/6400:/data
     - /etc/localtime:/etc/localtime
     - /etc/timezone:/etc/timezone
    ports:
     - 6400:6400
    networks:
      default:
        ipv4_address: 172.20.0.5
    restart: always
    environment:
      - SET_CONTAINER_TIMEZONE=true
      - CONTAINER_TIMEZONE=Asia/Shanghai
    privileged: true
    restart: always

  redis-cluster-five:
    hostname: redis-cluster-five
    container_name: redis-cluster-five
    build: ./6500
    volumes:
     - /data/redis-cluster/6500:/data
     - /etc/localtime:/etc/localtime
     - /etc/timezone:/etc/timezone
    ports:
     - 6500:6500
    networks:
      default:
        ipv4_address: 172.20.0.6
    restart: always
    environment:
      - SET_CONTAINER_TIMEZONE=true
      - CONTAINER_TIMEZONE=Asia/Shanghai
    privileged: true
    restart: always

  redis-cluster-six:
    hostname: redis-cluster-six
    container_name: redis-cluster-six
    build: ./6600
    volumes:
     - /data/redis-cluster/6600:/data
     - /etc/localtime:/etc/localtime
     - /etc/timezone:/etc/timezone
    ports:
     - 6600:6600
    networks:
      default:
        ipv4_address: 172.20.0.7
    restart: always
    environment:
      - SET_CONTAINER_TIMEZONE=true
      - CONTAINER_TIMEZONE=Asia/Shanghai
    privileged: true
    restart: always

networks:
  default:
    external:
      name: redisnetwork
其他节点配置文件省略...,除端口不同外,其余配置全部一致
编辑构建脚本
$ vim build.sh

#! /bin/bash

docker-compose -f redis.yml stop

docker-compose -f redis.yml rm --force

docker rmi redis-cluster_redis-cluster-one
docker rmi redis-cluster_redis-cluster-two
docker rmi redis-cluster_redis-cluster-three
docker rmi redis-cluster_redis-cluster-four
docker rmi redis-cluster_redis-cluster-five
docker rmi redis-cluster_redis-cluster-six

docker-compose -f redis.yml up -d
执行构建脚本
$ sh build.sh
成功构建,显示如下:

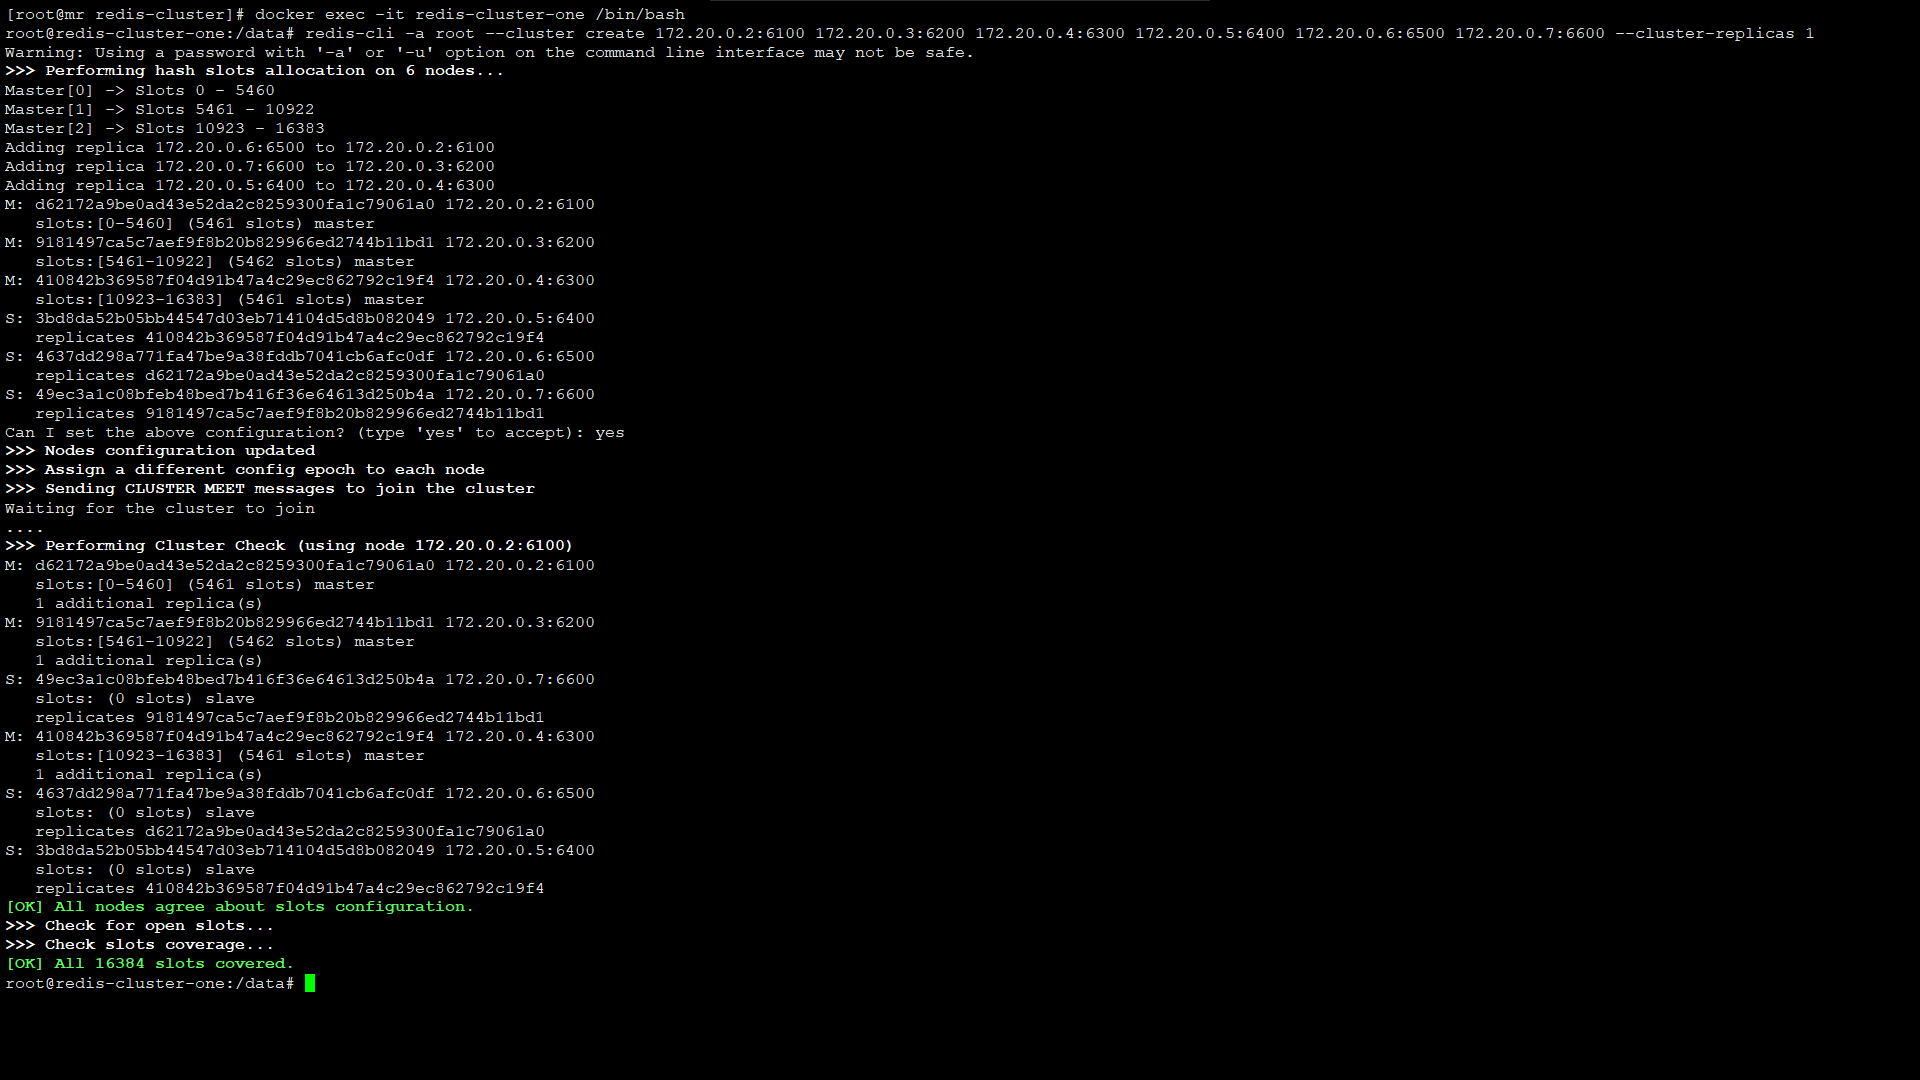
redis低版本则需要安装ruby,当前redis的版本为5.0.8,则不需要安装ruby,直接创建集群
$ redis-cli -a root --cluster create 172.20.0.2:6100 172.20.0.3:6200 172.20.0.4:6300 172.20.0.5:6400 172.20.0.6:6500 172.20.0.7:6600 --cluster-replicas 1
出现错误 Node 172.20.0.2:6100 is not empty. Either the node already knows other nodes (check with CLUSTER NODES) or contains some key in database 0.
解决方法:
1)、将需要新增的节点下aof、rdb等本地备份文件删除;
2)、同时将新Node的集群配置文件删除,即:删除你redis.conf里面cluster-config-file所在的文件;
3)、再次添加新节点如果还是报错,则登录新Node,./redis-cli–h x –p对数据库进行清除:
4)、flushdb #清空当前数据库
由此可以看出:
master节点172.20.0.2:6100,它的slave节点为172.20.0.6:6500

master节点172.20.0.3:6200,它的slave节点为172.20.0.7:6600

master节点172.20.0.4:6300,它的slave节点为172.20.0.5:6400
集群操作:
登陆集群:
# -c,使用集群方式登录
$ redis-cli -c -h 172.20.0.2 -p 6100 -a root
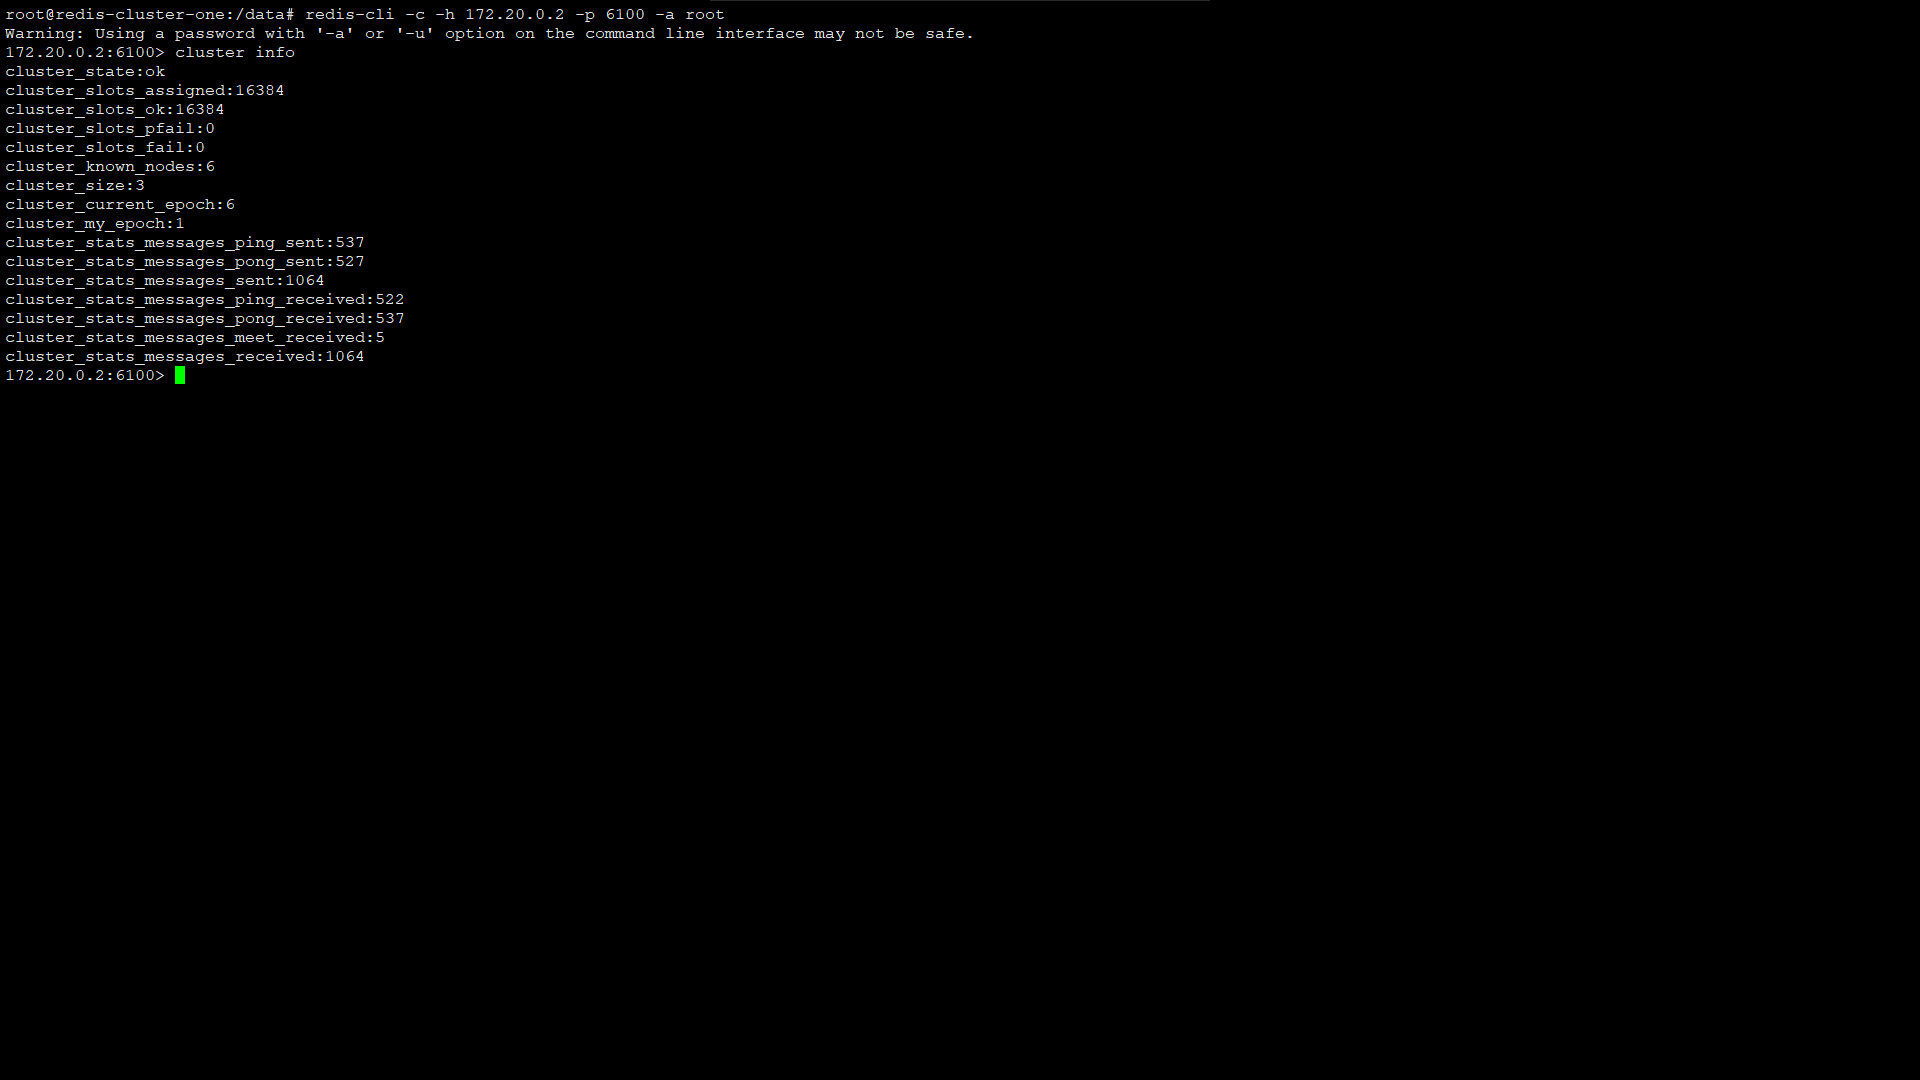
查看集群信息:
$ cluster info
列出节点信息:
$ cluster nodes

新增redis节点
172.20.0.8 端口:6700
172.20.0.9 端口:6800
集群增加节点:
$ cluster meet 172.20.0.8 6700
将新增的172.20.0.8:6700节点身份改为172.20.0.9:6800的slave:
$ redis-cli -c -h 172.20.0.8 -p 6700 -a root cluster replicate a311aae44e347fdf5b1928094c2ca69f2151f6df
删除集群节点
$ cluster forget a311aae44e347fdf5b1928094c2ca69f2151f6df
将节点配置信息保存到硬盘:
$ cluster saveconfig
缓存穿透是指查询一个一定不存在的数据,由于缓存是不命中时需要从数据库查询,查不到数据则不写入缓存,这将导致这个不存在的数据每次请求都要到数据库去查询,造成缓存穿透。
解决办法:
- 布隆过滤
对所有可能查询的参数以hash形式存储,在控制层先进行校验,不符合则丢弃。还有最常见的则是采用布隆过滤器,将所有可能存在的数据哈希到一个足够大的bitmap中,一个一定不存在的数据会被这个bitmap拦截掉,从而避免了对底层存储系统的查询压力。
补充:
Bloom filter
适用范围:可以用来实现数据字典,进行数据的判重,或者集合求交集
基本原理及要点:对于原理来说很简单,位数组+k个独立hash函数。将hash函数对应的值的位数组置1,查找时如果发现所有hash函数对应位都是1说明存在,很明显这个过程并不保证查找的结果是100%正确的。同时也不支持删除一个已经插入的关键字,因为该关键字对应的位会牵动到其他的关键字。所以一个简单的改进就是counting Bloom filter,用一个counter数组代替位数组,就可以支持删除了。添加时增加计数器,删除时减少计数器。
- 缓存空对象. 将 null 变成一个值
也可以采用一个更为简单粗暴的方法,如果一个查询返回的数据为空(不管是数 据不存在,还是系统故障),我们仍然把这个空结果进行缓存,但它的过期时间会很短,最长不超过五分钟。
缓存空对象会有两个问题:
第一,空值做了缓存,意味着缓存层中存了更多的键,需要更多的内存空间 ( 如果是攻击,问题更严重 ),比较有效的方法是针对这类数据设置一个较短的过期时间,让其自动剔除。
第二,缓存层和存储层的数据会有一段时间窗口的不一致,可能会对业务有一定影响。例如过期时间设置为 5分钟,如果此时存储层添加了这个数据,那此段时间就会出现缓存层和存储层数据的不一致,此时可以利用消息系统或者其他方式清除掉缓存层中的空对象。
使用互斥锁等待
限流、熔断、降级
如果缓存集中在一段时间内失效,发生大量的缓存穿透,所有的查询都落在数据库上,造成了缓存雪崩。
这个没有完美解决办法,但可以分析用户行为,尽量让失效时间点均匀分布。大多数系统设计者考虑用加锁或者队列的方式保证缓存的单线程(进程)写,从而避免失效时大量的并发请求落到底层存储系统上。
解决办法:
java锁实现限流,在缓存失效后,通过互斥锁来控制读数据库写缓存的线程数量。比如对某个key只允许一个线程查询数据和写缓存,其他线程等待。
数据预热,可以通过缓存reload机制,预先去更新缓存,再即将发生大并发访问前手动触发加载缓存不同的key,设置不同的过期时间,让缓存失效的时间点尽量均匀
给缓存的失效时间,加上一个随机值,避免集体失效
做二级缓存,或者双缓存策略。
A1为原始缓存,A2为拷贝缓存,A1失效时,可以访问A2,A1缓存失效时间设置为短期,A2设置为长期。
我们有两个缓存,缓存A和缓存B。缓存A的失效时间为20分钟,缓存B不设失效时间。自己做缓存预热操作。然后细分以下几个小点:
I 从缓存A读数据库,有则直接返回 II A没有数据,直接从B读数据,直接返回,并且异步启动一个更新线程。
III 更新线程同时更新缓存A和缓存B
- 缓存永远不过期 这里的“永远不过期”包含两层意思:
(1).从缓存上看,确实没有设置过期时间,这就保证了,不会出现热点key过期问题,也就是“物理”不过期。
(2).从功能上看,如果不过期,那不就成静态的了吗?所以我们把过期时间存在key对应的value里,如果发现要过期了,通过一个后台的异步线程进行缓存的构建,也就是“逻辑”过期
此处可能存在不合适展示的内容,页面不予展示。您可通过相关编辑功能自查并修改。
如您确认内容无涉及 不当用语 / 纯广告导流 / 暴力 / 低俗色情 / 侵权 / 盗版 / 虚假 / 无价值内容或违法国家有关法律法规的内容,可点击提交进行申诉,我们将尽快为您处理。


