

代码拉取完成,页面将自动刷新
Before sending your pull requests, make sure you do the following:
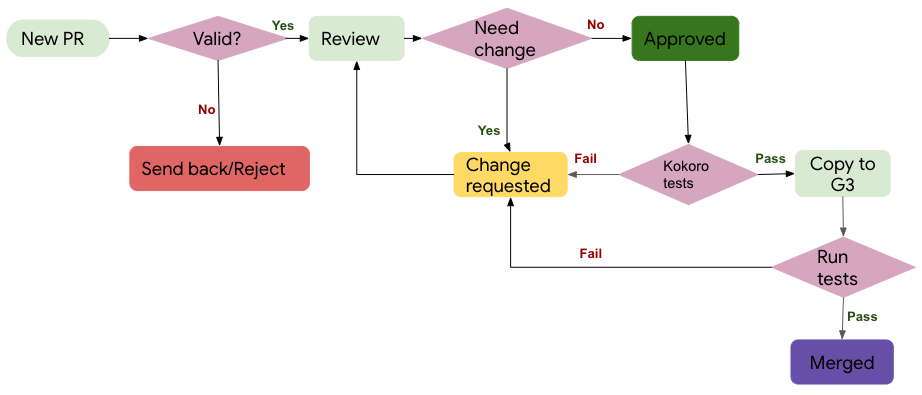
1. New PR
size:,
comp: etc. At this stage we check if the PR is valid and meets certain
quality requirements. For example, we check if the CLA is signed, PR has
sufficient description, if applicable unit tests are added, if it is a
reasonable contribution (meaning it is not a single liner cosmetic PR).2. Valid?
3. Review
4. Approved
kokoro:force-run label applied and it
initiates CI/CD tests.5. Copy to Google Internal codebase and run internal CI
In a graphical form, the entire lifetime of a PR looks like
We'd love to accept your patches! Before we can take them, we have to jump a couple of legal hurdles.
Please fill out either the individual or corporate Contributor License Agreement (CLA).
Follow either of the two links above to access the appropriate CLA and instructions for how to sign and return it. Once we receive it, we'll be able to accept your pull requests.
NOTE: Only original source code from you and other people that have signed the CLA can be accepted into the main repository.
If you have improvements to TensorFlow, send us your pull requests! For those just getting started, GitHub has a how-to.
TensorFlow team members will be assigned to review your pull requests. Once the
pull requests are approved and pass continuous integration checks, a TensorFlow
team member will apply ready to pull label to your change. This means we are
working on getting your pull request submitted to our internal repository. After
the change has been submitted internally, your pull request will be merged
automatically on GitHub.
If you want to contribute, start working through the TensorFlow codebase, navigate to the GitHub "issues" tab and start looking through interesting issues. If you are not sure of where to start, then start by trying one of the smaller/easier issues here i.e. issues with the "good first issue" label and then take a look at the issues with the "contributions welcome" label. These are issues that we believe are particularly well suited for outside contributions, often because we probably won't get to them right now. If you decide to start on an issue, leave a comment so that other people know that you're working on it. If you want to help out, but not alone, use the issue comment thread to coordinate.
Before sending your pull request for review, make sure your changes are consistent with the guidelines and follow the TensorFlow coding style.
Include a license at the top of new files.
Bazel BUILD files also need to include a license section, e.g., BUILD example.
Changes to TensorFlow C++ code should conform to Google C++ Style Guide.
Use clang-tidy to check your C/C++ changes. To install clang-tidy on ubuntu:16.04, do:
apt-get install -y clang-tidy
You can check a C/C++ file by doing:
clang-format <my_cc_file> --style=google > /tmp/my_cc_file.cc
diff <my_cc_file> /tmp/my_cc_file.cc
Changes to TensorFlow Python code should conform to Google Python Style Guide
Use pylint to check your Python changes. To install pylint and check a file
with pylint against TensorFlow's custom style definition:
pip install pylint
pylint --rcfile=tensorflow/tools/ci_build/pylintrc myfile.py
Note pylint --rcfile=tensorflow/tools/ci_build/pylintrc should run from the
top level tensorflow directory.
If you have Docker installed on your system, you can perform a sanity check on your changes by running the command:
tensorflow/tools/ci_build/ci_build.sh CPU tensorflow/tools/ci_build/ci_sanity.sh
This will catch most license, Python coding style and BUILD file issues that may exist in your changes.
There are two ways to run TensorFlow unit tests.
Using tools and libraries installed directly on your system.
Refer to the
CPU-only developer Dockerfile
and
GPU developer Dockerfile
for the required packages. Alternatively, use the said
tensorflow/build Docker images
(tensorflow/tensorflow:devel and tensorflow/tensorflow:devel-gpu are no
longer supported for) development. Use TF SIG Build Dockerfiles in
development to avoid installing the packages directly on your system (in
which case remember to change the directory from /root to /tensorflow
once you get into the running container so bazel can find the tensorflow
workspace).
you can do this by using the following command. As an example-
docker run -it --rm -v $PWD:/tmp -w /tmp tensorflow/build:2.15-python3.10
Once you have the packages installed, you can run a specific unit test in bazel by doing as follows:
export flags="--config=opt -k"
If the tests are to be run on the GPU, add CUDA paths to LD_LIBRARY_PATH and
add the cuda option flag
export LD_LIBRARY_PATH="${LD_LIBRARY_PATH}:/usr/local/cuda/lib64:/usr/local/cuda/extras/CUPTI/lib64:$LD_LIBRARY_PATH"
export flags="--config=opt --config=cuda -k"
For example, to run all tests under tensorflow/python, do:
bazel test ${flags} //tensorflow/python/...
For a single component e.g. softmax op:
bazel test ${flags} tensorflow/python/kernel_tests/nn_ops:softmax_op_test
For a single/parameterized test e.g. test_capture_variables in
tensorflow/python/saved_model/load_test.py:
(Requires python>=3.7)
bazel test ${flags} //tensorflow/python/saved_model:load_test --test_filter=*LoadTest.test_capture_variables*
Note: You can add --test_sharding_strategy=disabled to the flags to
disable the sharding so that all the test outputs are in one file. However,
it may slow down the tests for not running in parallel and may cause the
test to timeout but it could be useful when you need to execute a single
test or more in general your filtered/selected tests have a very low
execution time and the sharding
could create an overhead on the test execution.
Using Docker and TensorFlow's CI scripts.
# Install Docker first, then this will build and run cpu tests
tensorflow/tools/ci_build/ci_build.sh CPU bazel test //tensorflow/...
See TensorFlow Builds for details.
There are two ways to test the code in the docstring locally:
If you are only changing the docstring of a class/function/method, then you can test it by passing that file's path to tf_doctest.py. For example:
python tf_doctest.py --file=<file_path>
This will run it using your installed version of TensorFlow. To be sure you're running the same code that you're testing:
pip install -U tf-nightly
If you are changing the code and the docstring of a class/function/method, then you will need to build TensorFlow from source. Once you are setup to build from source, you can run the tests:
bazel run //tensorflow/tools/docs:tf_doctest
or
bazel run //tensorflow/tools/docs:tf_doctest -- --module=ops.array_ops
The --module is relative to tensorflow.python.
When building Tensorflow, passing
--config=dbg to Bazel will build with debugging information and without
optimizations, allowing you to use GDB or other debuggers to debug C++ code. For
example, you can build the pip package with debugging information by running:
bazel build --config=dbg //tensorflow/tools/pip_package:build_pip_package
TensorFlow kernels and TensorFlow's dependencies are still not built with
debugging information with --config=dbg, as issues occur on Linux if
there is too much debug info (see this GitHub
issue for context). If
you want to debug a kernel, you can compile specific files with -g using the
--per_file_copt bazel option. For example, if you want to debug the Identity
op, which are in files starting with identity_op, you can run
bazel build --config=dbg --per_file_copt=+tensorflow/core/kernels/identity_op.*@-g //tensorflow/tools/pip_package:build_pip_package
Note that the --config=dbg option is not officially supported.
此处可能存在不合适展示的内容,页面不予展示。您可通过相关编辑功能自查并修改。
如您确认内容无涉及 不当用语 / 纯广告导流 / 暴力 / 低俗色情 / 侵权 / 盗版 / 虚假 / 无价值内容或违法国家有关法律法规的内容,可点击提交进行申诉,我们将尽快为您处理。


