

代码拉取完成,页面将自动刷新
同步操作将从 OpenHarmony/arkui_ace_engine 强制同步,此操作会覆盖自 Fork 仓库以来所做的任何修改,且无法恢复!!!
确定后同步将在后台操作,完成时将刷新页面,请耐心等待。
本篇wiki将通过新增一个MyCircle组件为例,向大家展示新增一个JS UI组件的全流程。
完整的patch链接:https://gitee.com/theretherehuh/ace_ace_engine/pulls/1/files
可点击的展示类组件,展示一个圆,支持设置半径、边缘宽度和边缘颜色,可以通过点击事件获得当前圆的半径和边缘宽度。
| 手机 | 智慧屏 | 智能穿戴 | 轻量级智能穿戴 | 轻车机 |
|---|---|---|---|---|
| 支持 | 支持 | 支持 | 支持 | 支持 |
无
| 名称 | 属性类型 | 默认值 | 必填 | 描述 |
|---|---|---|---|---|
| circleradius | length | 20vp | 否 | 默认半径。 |
| 名称 | 属性类型 | 默认值 | 必填 | 描述 |
|---|---|---|---|---|
| circleedge | length color | 2vp red | 否 | 默认边缘颜色和宽度。 |
| 名称 | 参数类型 | 描述 |
|---|---|---|
| circleclick | {radius: circle radius, edgewidth: circle edge width} | 点击MyCircle组件时触发该回调,返回当前circle的半径和边缘宽度,单位是px。 |
<!-- xxx.hml -->
<div style="flex-direction: column;align-items: center;">
    <text>"MyCircle的半径为:{{radiusOfMyCircle}}"</text>
    <text>"MyCircle的边缘宽度为:{{edgeWidthOfMyCircle}}"</text>
    <mycircle  circleradius="40vp" style="circleedge: 2vp red;" @circleclick="onCircleClick"> </mycircle>
</div>
// xxx.js
export default{
    data:{
        radiusOfMyCircle: -1,
        edgeWidthOfMyCircle: -1,
    },
    onCircleClick(event) {
        this.radiusOfMyCircle = event.radius
        this.edgeWidthOfMyCircle = event.edgewidth
    }
}
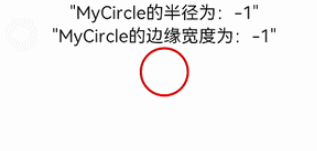
该界面最终效果如下图所示:
js的界面解析dom_type中增加新组件的属性定义dom_type.h中增加MyCircle的属性定义文件路径为:frameworks\bridge\common\dom\dom_type.h
// node tag defines
/* .................................... */
/* node tag defines of other components */
/* .................................... */
ACE_EXPORT extern const char DOM_NODE_TAG_MYCIRCLE[];

/* ........................... */
/* defines of other components */
/* ........................... */

// mycircle defines
ACE_EXPORT extern const char DOM_MYCIRCLE_CIRCLE_EDGE[];
ACE_EXPORT extern const char DOM_MYCIRCLE_CIRCLE_RADIUS[];
ACE_EXPORT extern const char DOM_MYCIRCLE_CIRCLE_CLICK[];
dom_type.cpp中增加MyCircle的属性值文件路径为:frameworks\bridge\common\dom\dom_type.cpp
// node tag defines
/* .................................... */
/* node tag defines of other components */
/* .................................... */
const char DOM_NODE_TAG_MYCIRCLE[] = "mycircle";

/* ........................... */
/* defines of other components */
/* ........................... */

// mycircle defines
const char DOM_MYCIRCLE_CIRCLE_EDGE[] = "circleedge";
const char DOM_MYCIRCLE_CIRCLE_RADIUS[] = "circleradius";
const char DOM_MYCIRCLE_CIRCLE_CLICK[] = "circleclick";
DOMMyCircle类dom_mycircle.h
文件路径:frameworks\bridge\common\dom\dom_mycircle.h
class DOMMyCircle final : public DOMNode {
    DECLARE_ACE_TYPE(DOMMyCircle, DOMNode);

public:
    DOMMyCircle(NodeId nodeId, const std::string& nodeName);
    ~DOMMyCircle() override = default;

    RefPtr<Component> GetSpecializedComponent() override
    {
        return myCircleChild_;
    }

protected:
    bool SetSpecializedAttr(const std::pair<std::string, std::string>& attr) override;
    bool SetSpecializedStyle(const std::pair<std::string, std::string>& style) override;
    bool AddSpecializedEvent(int32_t pageId, const std::string& event) override;

private:
    RefPtr<MyCircleComponent> myCircleChild_;
};
DOMMyCircle继承自DOMNode,主要功能是解析界面并生成相应的Component节点。
dom_mycircle.cpp
文件路径:frameworks\bridge\common\dom\dom_mycircle.cpp
一、组件属性的解析:SetSpecializedAttr
bool DOMMyCircle::SetSpecializedAttr(const std::pair<std::string, std::string>& attr)
{
    if (attr.first == DOM_MYCIRCLE_CIRCLE_RADIUS) { // "circleradius"
        myCircleChild_->SetCircleRadius(StringToDimension(attr.second));
        return true;
    }
    return false;
}
这个方法由框架流程调用,我们只需要在这个方法里面实现对应属性的解析,并且设置到MyCircleComponent中。
如上代码中,入参attr的格式形如<"circleradius", "40vp">,则我们只需要判断attr.first为"circleradius"时,将attr.second转换为Dimension格式,设置到MyCircleComponent中即可。设置完成后,返回true。
二、组件样式的解析:SetSpecializedStyle
bool DOMMyCircle::SetSpecializedStyle(const std::pair<std::string, std::string>& style)
{
    if (style.first == DOM_MYCIRCLE_CIRCLE_EDGE) { // "circleedge"
        std::vector<std::string> edgeStyles;
        // The value of [circleedge] is like "2vp red" or "2vp". To parse style value like this, we need 3 steps.
        // Step1: Split the string value by ' ' to get vectors like ["2vp", "red"].
        StringUtils::StringSpliter(style.second, ' ', edgeStyles);
        Dimension edgeWidth(1, DimensionUnit::VP);
        Color edgeColor(Color::RED);

        // Step2: Parse edge color and edge width accordingly.
        switch(edgeStyles.size()) {
            case 0: // the value is empty
                LOGW("Value for circle edge is empty, using default setting.");
                break;
            case 1: // case when only edge width is set
                // It should be guaranteed by the tool chain when generating js-bundle that the only value is a
                // number type for edge width rather than a color type for edge color.
                edgeWidth = StringUtils::StringToDimension(edgeStyles[0]);
                break;
            case 2: // case when edge width and edge color are both set
                edgeWidth = StringUtils::StringToDimension(edgeStyles[0]);
                edgeColor = Color::FromString(edgeStyles[1]);
                break;
            default:
                LOGW("There are more than 2 values for circle edge, please check. The value is %{private}s",
                    style.second.c_str());
                break;
        }

        // Step3: Set edge color and edge width to [mycircleStyle].
        myCircleChild_->SetEdgeWidth(edgeWidth);
        myCircleChild_->SetEdgeColor(edgeColor);
        return true;
    }
    return false;
}
这个方法由框架流程调用,我们只需要在这个方法里面实现对应样式的解析,并且保存到MyCircleComponent中。
如上代码中,入参style的格式形如<"circleedge", "2vp red">,则我们只需要判断style.first为"circleedge"时,将style.second进行解析,设置到MyCircleComponent中即可。设置完成后,返回true。
三、组件事件的解析:SetSpecializedEvent
bool DOMMyCircle::AddSpecializedEvent(int32_t pageId, const std::string& event)
{
    if (event == DOM_MYCIRCLE_CIRCLE_CLICK) { // "circleclick"
        myCircleChild_->SetCircleClickEvent(EventMarker(GetNodeIdForEvent(), event, pageId));
        return true;
    }
    return false;
}
这个方法由框架流程调用,我们只需要在这个方法里面实现对应事件的解析,并且保存到MyCircleComponent中。
如上代码中,只要判断入参event的值为"circleclick",则我们只需要使用eventId和pageId构造一个EventMarker,并设置到MyCircleComponent中即可。设置完成后,返回true。
dom_document.cpp里增加mycircle组件文件路径:frameworks\bridge\common\dom\dom_document.cpp
RefPtr<DOMNode> DOMDocument::CreateNodeWithId(const std::string& tag, NodeId nodeId, int32_t itemIndex)
{
    // code block
    static const LinearMapNode<RefPtr<DOMNode>(*)(NodeId, const std::string&, int32_t)> domNodeCreators[] = {
		// DomNodeCreators of other components
		{ DOM_NODE_TAG_MENU, &DOMNodeCreator<DOMMenu> },
		// "mycircle" must be inserted between "menu" and "navigation-bar"
        { DOM_NODE_TAG_MYCIRCLE, &DOMNodeCreator<DOMMyCircle> },
        { DOM_NODE_TAG_NAVIGATION_BAR, &DOMNodeCreator<DomNavigationBar> },
		// DomNodeCreators of other components
    };
	// code block
    return domNode;
}
这里尤其要注意一点,domNodeCreators[]是一个线性表,添加{ DOM_NODE_TAG_MYCIRCLE, &DOMNodeCreator<DOMMyCircle> }的地方必须要符合字母序。
DOM_NODE_TAG_MENU[] = "menu",
DOM_NODE_TAG_NAVIGATION_BAR[] = "navigation-bar",
DOM_NODE_TAG_MYCIRCLE[] = "mycircle"
所以DOM_NODE_TAG_MYCIRCLE的记录必须添加在"menu"之后,"navigation-bar"之前。
组件在后端的布局和绘制,需要相应地新增以下几个类:MyCircleComponent、MyCircleElement、RenderMyCircle、FlutterRenderMyCircle。
在后端引擎中,Component树、Element树和Render树为后端引擎维持和更新UI最为核心的三棵树。
MyCircleComponent类mycircle_component.h
文件路径:frameworks\core\components\mycircle\mycircle_component.h
class ACE_EXPORT MyCircleComponent : public RenderComponent {
    DECLARE_ACE_TYPE(MyCircleComponent, RenderComponent);

public:
    MyCircleComponent() = default;
    ~MyCircleComponent() override = default;

    RefPtr<RenderNode> CreateRenderNode() override;
    RefPtr<Element> CreateElement() override;

    void SetCircleRadius(const Dimension& circleRadius);
    void SetEdgeWidth(const Dimension& edgeWidth);
    void SetEdgeColor(const Color& edgeColor);
    void SetCircleClickEvent(const EventMarker& circleClickEvent);

    const Dimension& GetCircleRadius() const;
    const Dimension& GetEdgeWidth() const;
    const Color& GetEdgeColor() const;
    const EventMarker& GetCircleClickEvent() const;

private:
    Dimension circleRadius_ = 20.0_vp;
    Dimension edgeWidth_ = 2.0_vp;
    Color edgeColor_ = Color::RED;
    EventMarker circleClickEvent_;
};
mycircle_component.cpp
文件路径:frameworks\core\components\mycircle\mycircle_component.cpp
一、提供Set接口
void MyCircleComponent::SetCircleRadius(const Dimension& circleRadius)
{
    circleRadius_ = circleRadius;
}

void MyCircleComponent::SetEdgeWidth(const Dimension& edgeWidth)
{
    edgeWidth_ = edgeWidth;
}

void MyCircleComponent::SetEdgeColor(const Color& edgeColor)
{
    edgeColor_ = edgeColor;
}

void MyCircleComponent::SetCircleClickEvent(const EventMarker& circleClickEvent)
{
    circleClickEvent_ = circleClickEvent;
}
二、提供Get接口
const Dimension& MyCircleComponent::GetCircleRadius() const
{
    return circleRadius_;
}

const Dimension& MyCircleComponent::GetEdgeWidth() const
{
    return edgeWidth_;
}

const Color& MyCircleComponent::GetEdgeColor() const
{
    return edgeColor_;
}

const EventMarker& MyCircleComponent::GetCircleClickEvent() const
{
    return circleClickEvent_;
}
三、实现CreateRenderNode和CreateElement函数
RefPtr<RenderNode> MyCircleComponent::CreateRenderNode()
{
    return RenderMyCircle::Create();
}

RefPtr<Element> MyCircleComponent::CreateElement()
{
    return AceType::MakeRefPtr<MyCircleElement>();
}
MyCircleElement类mycircle_element.h
文件路径:frameworks\core\components\mycircle\mycircle_element.h
class MyCircleElement : public RenderElement {
    DECLARE_ACE_TYPE(MyCircleElement, RenderElement);

public:
    MyCircleElement() = default;
    ~MyCircleElement() override = default;
};
该组件在element层不涉及更多操作,只需要定义MyCircleElement类即可。
RenderMyCircle类render_mycircle.h
文件路径:frameworks\core\components\mycircle\render_mycircle.h
using CallbackForJS = std::function<void(const std::string&)>;

class RenderMyCircle : public RenderNode {
    DECLARE_ACE_TYPE(RenderMyCircle, RenderNode);

public:
    static RefPtr<RenderNode> Create();

    void Update(const RefPtr<Component>& component) override;
    void PerformLayout() override;
    void HandleMyCircleClickEvent(const ClickInfo& info);

protected:
    RenderMyCircle();
    void OnTouchTestHit(
        const Offset& coordinateOffset, const TouchRestrict& touchRestrict, TouchTestResult& result) override;

    Dimension circleRadius_;
    Dimension edgeWidth_ = Dimension(1);
    Color edgeColor_ = Color::RED;
    CallbackForJS callbackForJS_;                   // callback for js frontend
    RefPtr<ClickRecognizer> clickRecognizer_;
};
render_mycircle.cpp
文件路径:frameworks\core\components\mycircle\render_mycircle.cpp
一、处理点击事件
RenderMyCircle::RenderMyCircle()
{
    clickRecognizer_ = AceType::MakeRefPtr<ClickRecognizer>();
    clickRecognizer_->SetOnClick([wp = WeakClaim(this)](const ClickInfo& info) {
        auto myCircle = wp.Upgrade();
        if (!myCircle) {
            LOGE("WeakPtr of RenderMyCircle fails to be upgraded, stop handling click event.");
            return;
        }
        myCircle->HandleMyCircleClickEvent(info);
    });
}

void RenderMyCircle::OnTouchTestHit(
    const Offset& coordinateOffset, const TouchRestrict& touchRestrict, TouchTestResult& result)
{
    clickRecognizer_->SetCoordinateOffset(coordinateOffset);
    result.emplace_back(clickRecognizer_);
}

void RenderMyCircle::HandleMyCircleClickEvent(const ClickInfo& info)
{
    if (callbackForJS_) {
        auto result = std::string("\"circleclick\",{\"radius\":")
                    .append(std::to_string(NormalizeToPx(circleRadius_)))
                    .append(",\"edgewidth\":")
                    .append(std::to_string(NormalizeToPx(edgeWidth_)))
                    .append("}");
        callbackForJS_(result);
    }
}
1、创建一个ClickRecognizer;
2、重写OnTouchTestHit函数,注册RenderMyCircle的ClickRecognizer,这样在接收到点击事件时即可触发创建ClickRecognizer时添加的事件回调;
3、实现在接收到点击事件之后的处理逻辑HandleMyCircleClickEvent
二、重写Update函数
void RenderMyCircle::Update(const RefPtr<Component>& component)
{
    const auto& myCircleComponent = AceType::DynamicCast<MyCircleComponent>(component);
    if (!myCircleComponent) {
        LOGE("MyCircleComponent is null!");
        return;
    }
    circleRadius_ = myCircleComponent->GetCircleRadius();
    edgeWidth_ = myCircleComponent->GetEdgeWidth();
    edgeColor_ = myCircleComponent->GetEdgeColor();
    callbackForJS_ =
        AceAsyncEvent<void(const std::string&)>::Create(myCircleComponent->GetCircleClickEvent(), context_);

    // call [MarkNeedLayout] to do [PerformLayout] with new params
    MarkNeedLayout();
}
Update函数负责从MyCircleComponent获取所有绘制、布局和事件相关的属性更新。
三、重写PerformLayout函数
void RenderMyCircle::PerformLayout()
{
    double realSize = NormalizeToPx(edgeWidth_) + 2 * NormalizeToPx(circleRadius_);
    Size layoutSizeAfterConstrain = GetLayoutParam().Constrain(Size(realSize, realSize));
    SetLayoutSize(layoutSizeAfterConstrain);
}
PerformLayout函数负责计算布局信息,并且调用SetLayoutSize函数设置自己所需要的布局大小。
FlutterRenderMyCircle类flutter_render_mycircle.h
文件路径:frameworks\core\components\mycircle\flutter_render_mycircle.h
class FlutterRenderMyCircle final : public RenderMyCircle {
    DECLARE_ACE_TYPE(FlutterRenderMyCircle, RenderMyCircle);

public:
    FlutterRenderMyCircle() = default;
    ~FlutterRenderMyCircle() override = default;

    void Paint(RenderContext& context, const Offset& offset) override;
};
flutter_render_mycircle.cpp
文件路径:frameworks\core\components\mycircle\flutter_render_mycircle.cpp
一、实现RenderMyCircle::Create()函数
RefPtr<RenderNode> RenderMyCircle::Create()
{
    return AceType::MakeRefPtr<FlutterRenderMyCircle>();
}
RenderMyCircle::Create()在基类RenderMyCircle中定义,因为我们当前使用的是flutter引擎,所以在flutter_render_mycircle.cpp里面实现,返回在flutter引擎上自渲染的FlutterRenderMyCircle类。
二、重写Paint函数
void FlutterRenderMyCircle::Paint(RenderContext& context, const Offset& offset)
{
    auto canvas = ScopedCanvas::Create(context);
    if (!canvas) {
        LOGE("Paint canvas is null");
        return;
    }
    SkPaint skPaint;
    skPaint.setAntiAlias(true);
    skPaint.setStyle(SkPaint::Style::kStroke_Style);
    skPaint.setColor(edgeColor_.GetValue());
    skPaint.setStrokeWidth(NormalizeToPx(edgeWidth_));

    auto paintRadius = GetLayoutSize().Width() / 2.0;
    canvas->canvas()->drawCircle(offset.GetX() + paintRadius, offset.GetY() + paintRadius,
        NormalizeToPx(circleRadius_), skPaint);
}
Paint函数负责调用canvas相应接口去进行绘制,这一步可以认为是新增组件的最后一步,直接决定在屏幕上绘制什么样的UI界面。
到这里,新增一个MyCircle组件所需的所有步骤都已经完成,我们可以展示一个圆,支持设置半径、边缘宽度和边缘颜色,可以通过点击事件获得当前圆的半径和边缘宽度。
当然MyCircle组件是比较简单的示例组件,JS UI开发框架支持更多更复杂的组件开发,比如提供单行文本输入组件TextInput、提供日历展示的Calendar组件等,更多的用法期待你来探索~
此处可能存在不合适展示的内容,页面不予展示。您可通过相关编辑功能自查并修改。
如您确认内容无涉及 不当用语 / 纯广告导流 / 暴力 / 低俗色情 / 侵权 / 盗版 / 虚假 / 无价值内容或违法国家有关法律法规的内容,可点击提交进行申诉,我们将尽快为您处理。


